


In order to successfully manage quick service restaurants, business owners need enough funding, loyal customers, and tools to optimize operations. One of the typical tools used in quick service establishments is POS, or point of sale.
Point of sale typically is an all-in-one software that allows you to ring up sales, take orders, manage inventory, customers, and employees, and provide useful reporting.
In this post, we will cover how to manage your quick service restaurant with eHopper POS successfully.
eHopper POS Overview
Ehopper is a full-featured POS software that works on multiple devices, including Windows PC, Android tablets 4.4 and up, iPad and iPad mini, and Poynt terminals.
Watch eHopper POS Quick Service Demonstration video:

A. Back Office
1. Manage Inventory
Inventory creation in eHopper POS is easy and follows a simple hierarchy that keeps your inventory highly organized. The process starts by creating a department for your items.
This is followed by creating a category that falls under that department, and then a product that falls under that category. You can also create modifiers and ingredients that can quickly be assigned to specific products.
Create a Product
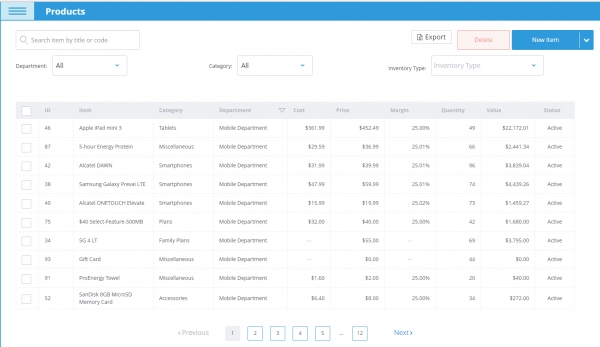
Products in eHopper can either be imported all at once from a .csv file or uploaded manually in the system. You have a choice of creating various types of products, including inventory, non-inventory, serialized products, products with ingredients, and matrix products.
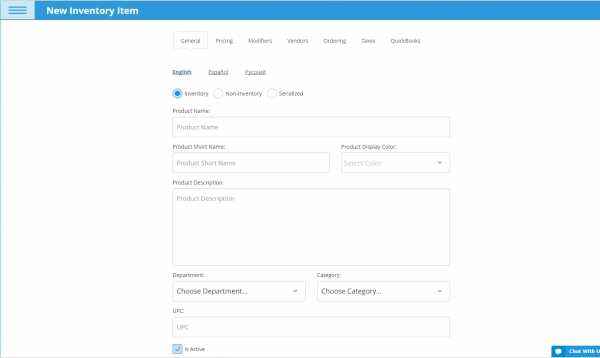

Each product can be assigned a unique UPC code that can then instantly be brought up to a customer’s shopping cart or for inventory tracking with a quick scan. Product images may also be uploaded on the point of sale for quick recognition.
You may choose to give each product either a fixed price or a manual price that will be entered at the point of sale. Then, select a specific unit of measurement to sell the product by, such as by item, inch, or pound.
Quantity specifications for your products can be submitted for each store so that you can more easily monitor and control how much stock you have at all times and avoid running out.
Finally, you may assign taxes to your product that will automatically be added to the order price once selected for the shopping cart.
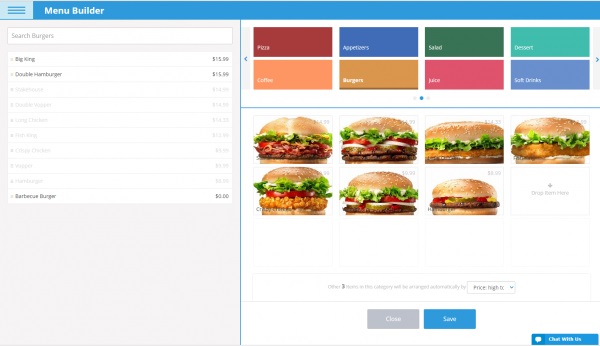
Build a Menu
Once your inventory is set up, eHopper POS allows you to customize your menu with the Menu Builder app to ensure that you find items to bring up for customers’ orders as fast as possible.
Easily sort the order you would like categories and items to appear in the POS product catalogue and filter items by alphabetical order, price, or creation date. Categories and products can also both be customized by color for quick recognition in the point of sale.

Add Modifiers
Modifiers are a great way to provide guests with more options in customizing items in their orders, resulting in higher customer satisfaction. In eHopper POS, Modifier Groups contain one or more sets of specific modifier options.
These Modifier Groups can then easily be edited, copied over to a new Modifier Group, or added to one or multiple products at once.
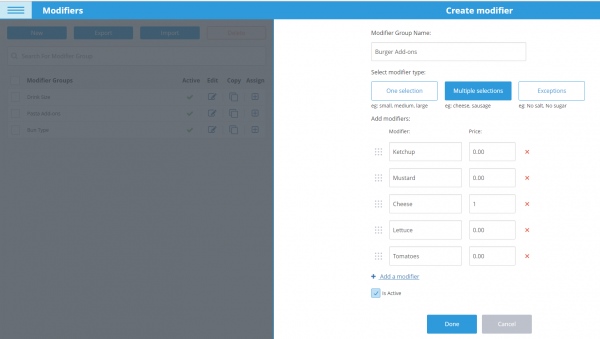

There are 3 types of modifiers that can be assigned to Modifier Groups. The first allows customers to optionally choose multiple selections to add to an item, such as adding ketchup, mustard, and mayonnaise to a burger.
The second modifier type prompts customers to choose only one selection for a product, such as selecting either a small or large soda.
One of these options must be chosen to move on with the order. The third type, exceptions, allows customers to exclude certain selections from their item, such as choosing not to have lettuce or tomatoes on their burger.
You can also set specific prices for modifiers, resulting in either an up-charge or down-charge from the product’s default price with their selection.
Set Up Ingredients and Assign Them to Products
Like products, ingredients can be imported and exported, assigned a unique barcode for easy tracking, and have vendor costs added to obtain knowledge of the ingredients’ profit margins.
Product ingredients could also include non-food items, such as silverware and napkins. After an ingredient is added to the system, it can be assigned to any product or modifier, set at specific quantities.
Each time a product or modifier with that ingredient is sold, the quantity of the ingredient set for that product or modifier will be automatically deducted from the ingredient stock. Stock of ingredients can be tracked by either smaller or larger units.
For example, eggs can be tracked by either each individual egg or a carton of 12 eggs. When 12 eggs are used up, one egg carton will be deducted from the inventory, along with 12 units of eggs.
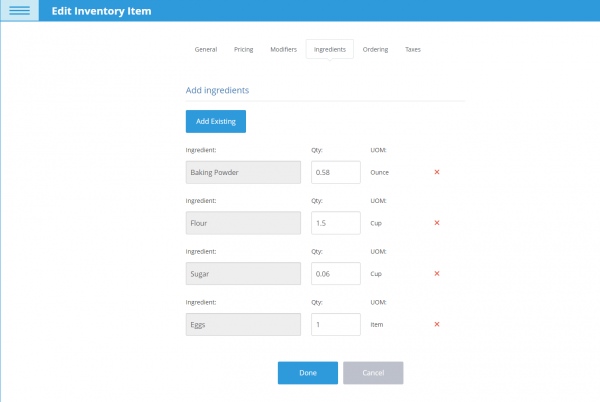

Products and modifiers can be assigned specific quantities of multiple ingredients, allowing for recipe building. When the item is sold, all ingredient quantities that make up its recipe will be deducted from your inventory.
A helpful feature is that you can see how many quantities of a product are in stock at any given time with, considering all its ingredients that are currently on hand.
2. Manage Employees
Easily create new employee profiles or edit existing ones, with information such as the unique email, password, and PIN they will use to log in to the system and the employee role they will be assigned, which comes with certain permissions.
For example, you can control whether sales people will have to enter a manager’s PIN to edit price and discounts of items.
You can also grant them access to only specific stores. With such controls over your employees, you can safeguard against employee mistakes and theft and control who has access to different aspects of your business information and functions.
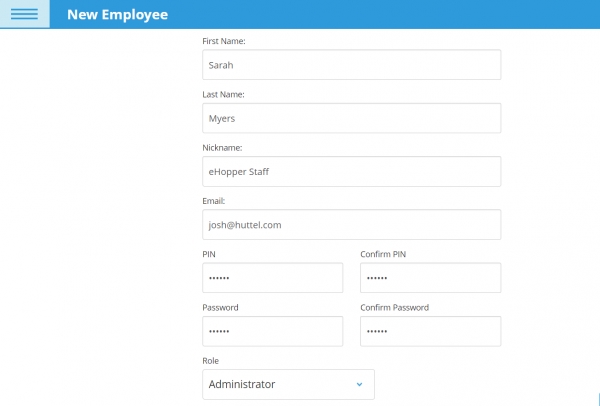

Finally, you can record the employee’s contact information and select their language specifications for the point of sale.
3. Track Operations with Reporting
Real time reporting is crucial for illustrating the overall health of your business at any given time, including its strengths and weaknesses. Different reports shine a light on various aspects of your business, backed by data and numbers that do not lie.
This invaluable insight can be used to make more intelligent and strategic business decisions that will improve your bottom line by facilitating growth and decreasing costs.
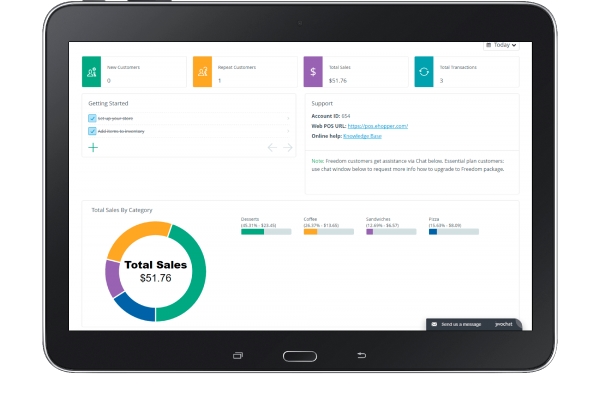
Company-Wide Reporting on the Dashboard
On the Back Office dashboard, you can view company-wide statistics, such as the number of new and repeat customers, gross sales, total transactions, and refund amount.
This data can be filtered by store and time period, including by a custom time range. This allows for a better understanding of how your company is performing as a whole in different periods of time.
The same filters apply to the Gross Sales by Category pie chart, where you can view the amount of sales in currency amount and percentage per each category of items, helping you grasp which of your categories are performing the best and worst in specific time periods.

Inventory Reporting
With the Inventory Report, you can analyze food costs and profit margins, determining which menu items have the potential to be the most profitable or the least, causing you to lose money.
This data provides insight into how to adapt your menu to make the most revenue and reduce costs.
Based on the insight, you may decide to promote and prioritize certain items and categories and cut or dispose of others or to make pricing changes to reflect high or low costs for products.

Product Mix Report
Just because an item may seem more or less profitable based on profit margins, it may actually prove to be the opposite when taking into account its quantity sold.
With the Product Mix Report, you can see which sold items are making you the most overall profit or causing you to lose money, along with their detailed stock information, all within different periods of time, providing a full picture of what is and isn’t working with your menu of items.
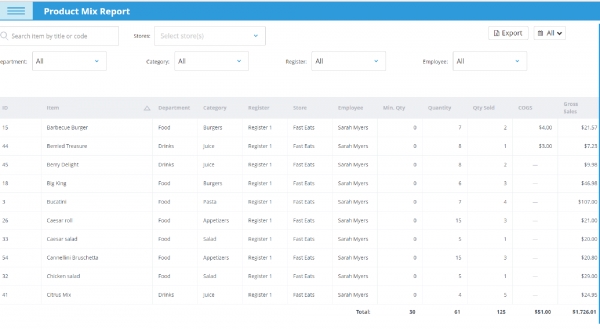

From this report, you can also determine such information as which overall category of products is selling the best, which employees have generated the most and least revenue, and which products have been refunded or discounted the most.
With this data, you can make such calculated and informed decisions as how to appropriately change your stock numbers or pricing, which employees to promote or cut, whether to discontinue or provide item discounts, and at what times of day or the year you should promote certain items or bring in more staffing.
You can also see this data from all of your inventory combined, in the Totals section.
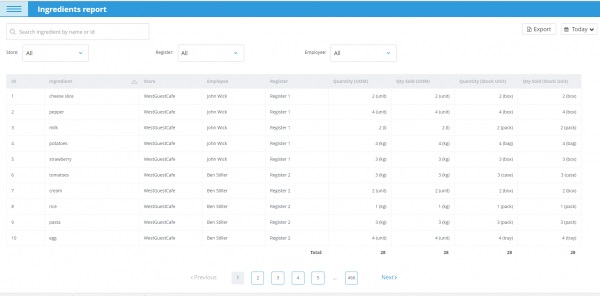
Modifier and Ingredients Reporting
You can make similar decisions on your modifiers and ingredients in those reports, such as which modifiers and ingredients should be ordered more of or discontinued, based on profit margin and quantity sold.

Sales Reports
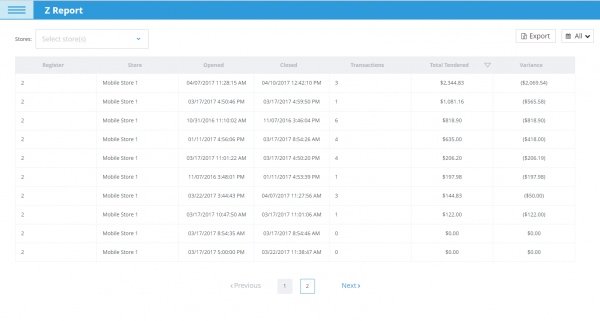
With the Z report, you can view all shifts that occurred in different time periods and see such detailed info as what time the register was opened and closed, the number of transactions, total sales, the cash flow, revenue, and the tender breakdown for each shift.

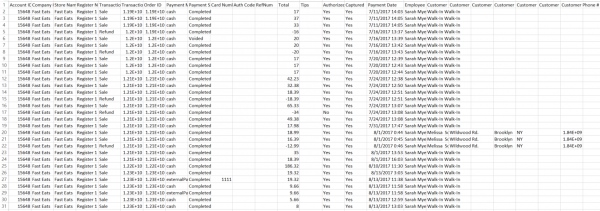
In the Transactions Report, you can view all transactions, and filter for customer, employee, store register, time period, and currency range.

Tips and Taxes Reports
The Tips Report allows you to see the amount of tips given to each employee and the transaction data for when the tip was provided.
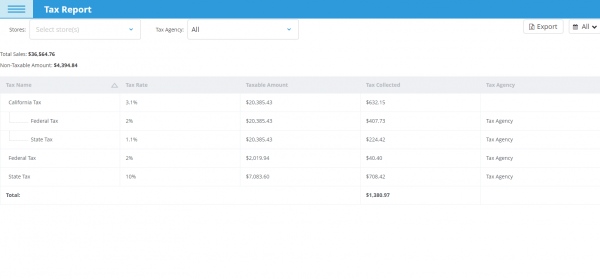
The Tax Report reveals how much of each tax was collected for different time periods and the overall sales total for orders with each of those taxes.

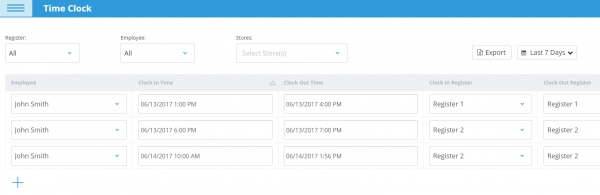
Time Clock Report
With the Time Clock Report, you can analyze the productivity of your staff by viewing the total hours each employee worked, along with how long each of those shifts lasted for in different time periods, filtering by employee, register or store. This data is automatically entered when an employee clocks in and out or can be inputted manually.

4. Manage Inventory Stock with Vendors and Multiple Locations
As mentioned, based on your inventory reporting, you can quickly and accurately keep tabs on of all of your inventory stock at all times to ensure that you never run out or over-order.
This will result in, reduction of waste and theft, smoother operations, and increased profitability and long term success.
If you decide to make stock changes based on the data presented in the reports, this data can be easily updated in eHopper.
With the Purchase Order Receiving app, you can update the inventory stock of items or ingredients as they come in from vendors from any store.
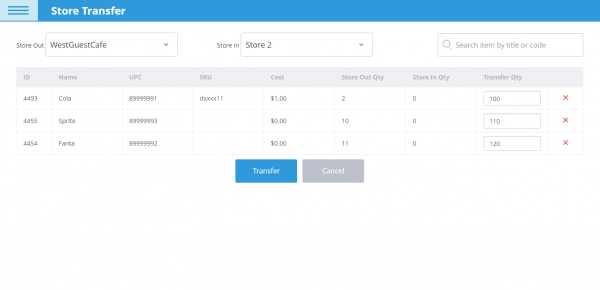
Similarly, with the Store Transfer app, you can transfer products and ingredients inventory from one store to another for more efficient inventory management.
Finally, with Inventory Adjustments, you can report damaged or lost inventory, which is vital for maintaining accurate stock levels.

These updates can be performed with a listed view of all products or by manually searching for the product, by either entering their name or UPC code into the search bar or scanning the barcode with a scanning device.
5. Accounting Software
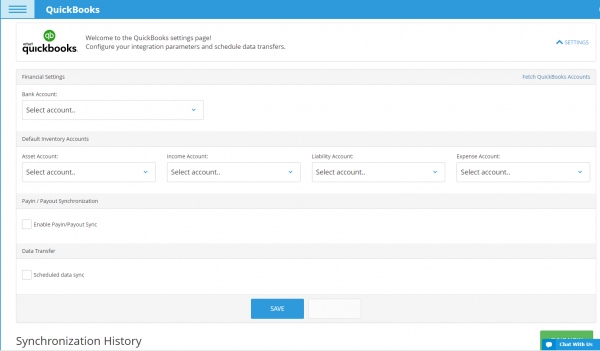
eHopper POS is also compatible with Quickbooks Online for seamless auditing and record keeping.

B. Point of Sale
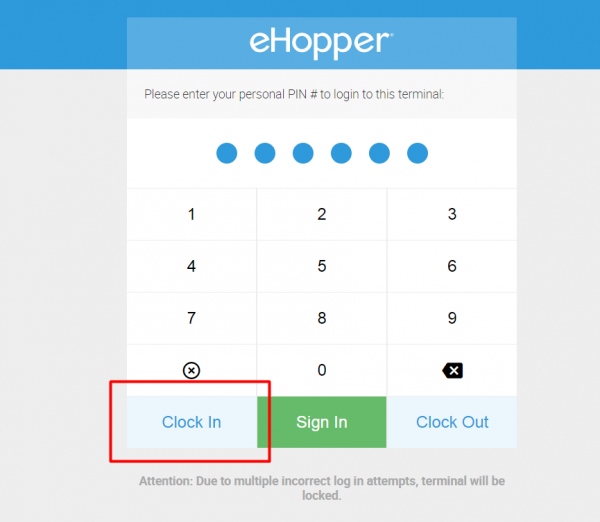
1. How to Set Up POS
Each register has a unique license key that can be only be used by one employee at a time. As mentioned earlier, employees also have a unique PIN ID that they must use to sign in. These credentials ensure that all access is safe and secure.
Employees can also easily clock in and out of the system each time they begin or end a shift so that their hours may be instantly and accurately recorded in the Time Clock.

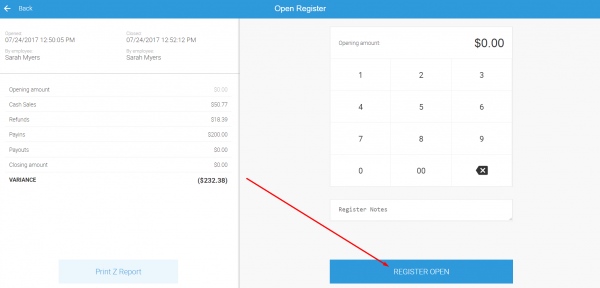
2. Open Register
Employees begin their shift by opening the register, where they can view and analyze data from the previous shift, enter the amount of cash currently in the drawer for record keeping, and enter any register notes.

3. Manage Customers
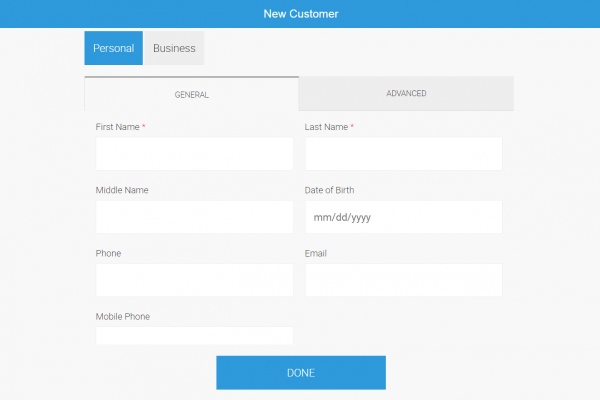
For each order, employees can select an existing customer or add a new one, recording such information as their name, phone number, email, age, and address. A customer’s business info can be added as well. These customer details can be edited at any time.

Once in the system, the customer can be quickly searched for by name or phone number and chosen for orders. You can also quickly bring up his details and order history.
With this info, you can create customer profiles, tracking and gaining insight on what a customer usually orders, his payment and ordering habits, how frequently he comes in, and his address for delivery orders.
This way, you can personalize their service and direct resources to them faster and more efficiently, resulting in more satisfied and returning customers. You can also become familiar with who your best and most frequent customers are and prioritize toward them.
4. Manage Orders
Once a customer is selected for an order, you can choose from several Order Type options, including dine in, take out, drive-thru, and delivery.

Adding items to an order is quick and easy. Simply select the item’s category, followed by the item. If modifiers were assigned to the item, select the modifier options that the customer is requesting.
Items in the shopping cart can also be reselected in the shopping cart for further editing. Change the quantity or price, apply a discount to the item, or edit the modifiers if the customer changed their mind, all with the quick push of a button.
If set up in Back Office, taxes will automatically be added to the price of the order, with each one listed separately in the Total section.
The default tax can be changed or exempt from the order at any point before the transaction is processed. All of the order’s pricing information, including discounts, taxes, and tips are displayed in the Total section.
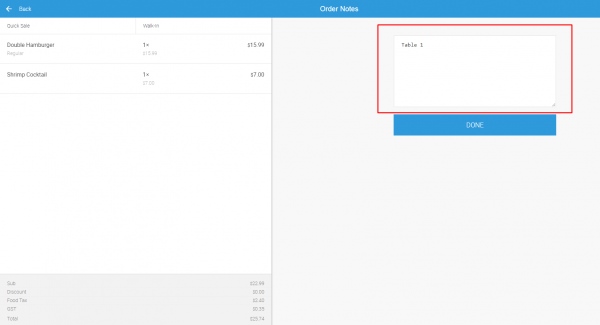
A great way to efficiently customize orders for customers is by adding notes to either an item or the entire order.
These notes will appear on the receipt, including the kitchen receipt so the kitchen staff can be informed about the order and its specifications with little chance of error. For example, you may specify in the order notes that the customer wants his pizza well-done.

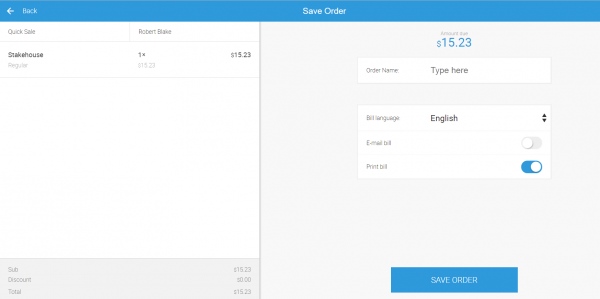
Another option is to save the order to access and edit it at a later time. Before saving, you can assign the order an Order Name for easy tracking and helpful notes in the system.
For example, for dine-in orders, you may name the order with the table number and number of customers at the table for table management and customer tracking purposes. Once saved, the kitchen receipt, best placed by the kitchen equipment and staff, will be printed, allowing for quick, seamless, and more organized table service.
The order can then be accessed again from the Orders screen. Here, you can view all open and closed orders, with the most recent appearing first. From this screen, you can manage all open orders that are not yet fulfilled, filtering by order type, register, and order status to better prioritize and plan out orders.
With this strategy, customers can be served the in the most efficient, organized, and quickest way possible, increasing customer satisfaction and leading to more sales. You can also see where issues exist, such as slow service and employee underperformance.
Once the saved order is reopened, further edits could be made to the order and more items can be added as well.
You can regularly update an order’s fulfillment status to always remain informed about its current status, even after it is processed. Service will be more organized and seamless as a result, minimizing wait time for customers.
The Fulfillment options are “New,” “In Preparation,” “Prepared,” “In Fulfillment,” and “Fulfilled.” For example, if the food in the order is being prepared, the status to reflect this would be the “In Preparation” status, which will then be visible on the Order list. Once the order has been processed and brought to the customer, the status should be updated to “Fulfilled.”
If after an order is processed, the customer asks for a refund, this can easily be performed, with the amount due back to the customer appearing. You can also perform manual refunds.

Manage Deliveries
You can manage your delivery orders by filtering for Delivery order types on the Orders list and then, by viewing their fulfillment status, seeing which orders have not yet been sent out, which are on their way to customers, and which have been delivered successfully.
If you see that an order is taking a particularly long time to be delivered, you can proactively call the customer to maintain a positive relationship.
You can also name each delivery order with the assigned driver’s name to efficiently manage your delivery drivers and remain informed of which drivers are currently available.
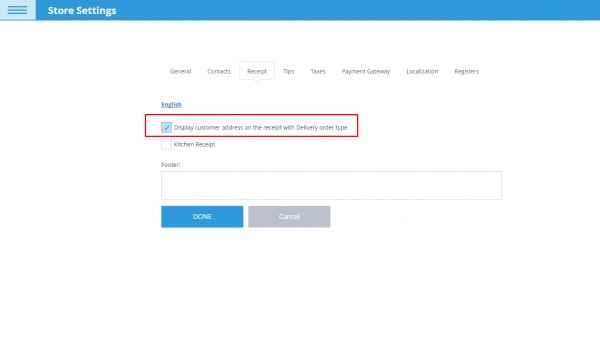
When the order is ready to be delivered, hand the receipt to the driver. You can configure delivery receipts to automatically print the customer’s address to reduce driver error and increase efficiency.

5. Process Payments
eHopper POS offers various payment methods, including cash, credit, debit, external, and split payments. All of these options are fast and easy, resulting in quick checkouts and shorter lines.
Cash Transactions
To process cash transactions, first input the amount of cash that the customer provides for the order.
This can be expedited by simply tapping the quick pay buttons, which can be modified in Back Office settings to reflect the most common bills received from customers. Select “Exact” when a customer provides the exact amount for the order for instant processing.
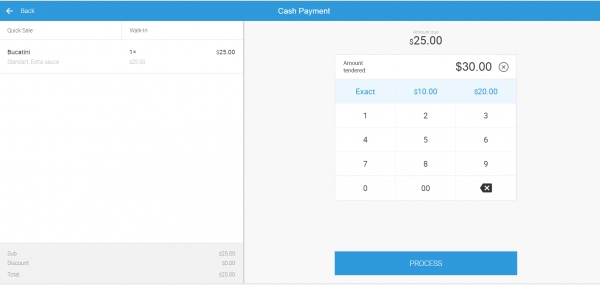

Once processed, the amount of change due back to the customer automatically appears. If configured, the cash drawer will also instantly open on this screen.
After selecting “Done,” the receipt will print to the receipt and/or kitchen printer, depending on your settings. You also have the option of emailing the receipt to the customer.
Split Payments
Performing split payments, which are very common in quick service restaurants, is quick and seamless on eHopper POS. Up to 5 guests can share the cost of an order in any proportion, with each using any payment type they would like that is compatible with eHopper.
Simply choose how many customers are participating in the payment and the bill is automatically split evenly among them, with the option to change the currency amount for any of the individual payments.
If the cost of one or more customer’s payment is changed, the other payments automatically split evenly amongst the amount left in the order.
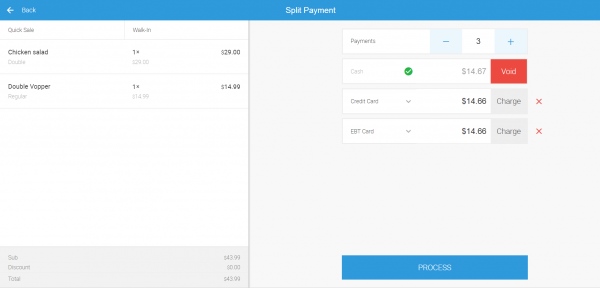
Choose the preferred payment method for each guest and process each separately. Any of these payments can then be voided or canceled. Once all payments are processed, process the split payment as a whole, print or email the receipt, and then you may move on to the next customer.
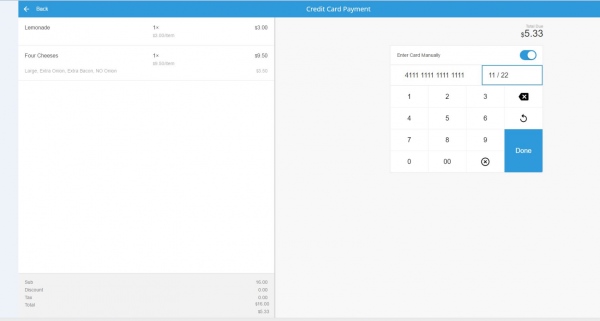
EMV Compliant Credit/Debit
Credit and debit card payments are EMV compliant and processed directly through the system with either PAX or Poynt terminals. Customer signatures and tips are also available, with signatures accessible at any point after the transaction.
6. Manage Your Cash Flow
At the end of the day, you can review all customer tips and close the batch, sending all money from card payments directly to your bank.
You can also efficiently manage and track your cash flow with the Pay-ins and Pay-outs feature and by viewing the Z and X reports at the beginning and end of your shifts.
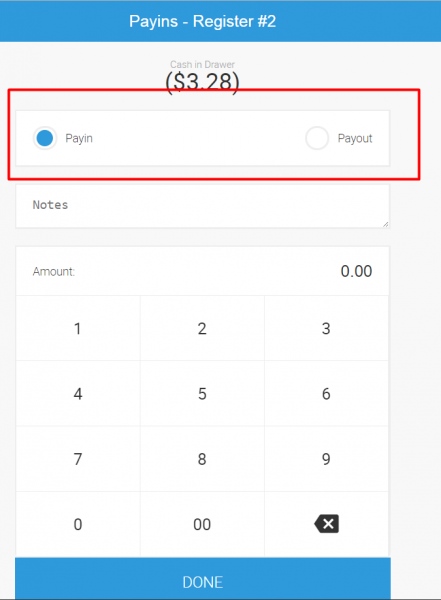

When opening or closing the register, compare how much cash is currently in the drawer with the expected amount shown in the X or Z report to see if there is any discrepancy. If there is, you can make a note of it in the register notes. The X and Z reports can be printed as well.
More Information
For more information on eHopper POS, please visit eHopper.com.