How to Integrate eHopper POS with WooCommerce [Updated]
Nowadays, in order to successfully compete, small business owners must provide customers with a friction-less experience, especially now in the wake of the coronavirus pandemic. Luckily, it is very easy to do that and in a cost-effective way, with the eHopper POS integration with WooCommerce and Amazon Lightsail.
This integration provides businesses of all sizes the power to seamlessly run their operations, both, online and offline, which is another crucial element in order to survive in today’s turbulent times.
What are the requirements?
1. Create and set up an eHopper POS account
2. Create and set up an Amazon Lightsail account
3. Install WordPress and WooCommerce on Lightsail
4. Connect eHopper POS with WooCommerce
5. Important! Don’t update installed plugins or install new plugins
What is eHopper POS?
eHopper is a cloud-based POS platform that is ideal for the retail and hospitality industries. eHopper POS is easy to use, cross-platform, and available on eHopper All-in One devices, Android tablets, iPads, Windows PCs, and the Poynt terminal. It fully supports EMV payments, inventory, customers, employee management and much more. It also provides a fully integrated online and offline solution with a POS, self-serve kiosks, online ordering capabilities, loyalty programs, and other valuable apps.
What is Lightsail?
Lightsail is an easy-to-use cloud platform that offers you everything necessary to build a website, with a cost-effective, monthly plan. Whether you’re new to the cloud or looking to get on the cloud quickly with AWS infrastructure you trust, it’s got you covered.
What is WordPress?
WordPress is the most popular open-source content management system (CMS) for building and managing websites. It now powers over 35% of all the websites on the Internet! And it’s absolutely free, licensed under GPLv2. WordPress is also very easy to install and use, even for those who do not know anything about programming.
What is WooCommerce?
WooCommerce is a WordPress eCommerce plugin. It is also open-source and completely free. Getting started is easy. Simply add the WooCommerce plugin to your WordPress site and then configure your store in minutes. With eCommerce, you can have all your products listed and fully synced with eHopper POS, and accept secure payments, all out of the box–for free.
How to integrate eHopper POS with WooCommerce
A. Create an eHopper Account
1. Go to https://ehopper.com/pricing/ and select your preferred plan.
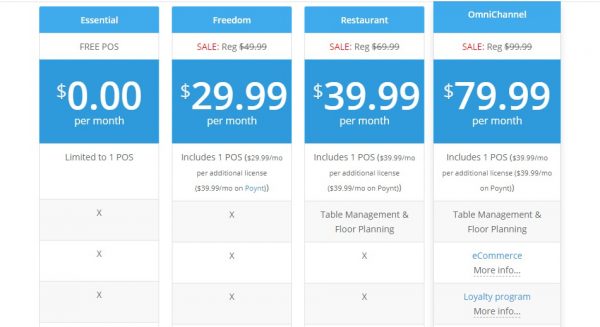
Select your eHopper pricing plan.
2. Fill out and submit the form to create your eHopper account.
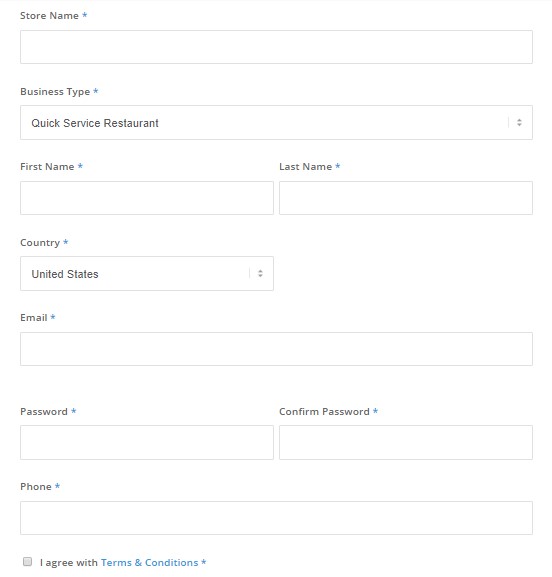
Create your eHopper account by filling out the signup form.
3. You will receive an eHopper welcome email with your account credentials and links to log in.
4. If you are using eHopper on an iPad, Android tablet, or Poynt terminal, install the eHopper POS app from the iTunes Store, Google Play Store, or Poynt App Store, respectively, and then open the app. If you are using an eHopper All-in-One device, the app will come pre-loaded. If using eHopper on a PC, open Google Chrome and navigate to pos.ehopper.com.
5. Enter the Account ID and License Key provided in your welcome email and then select the Done button.
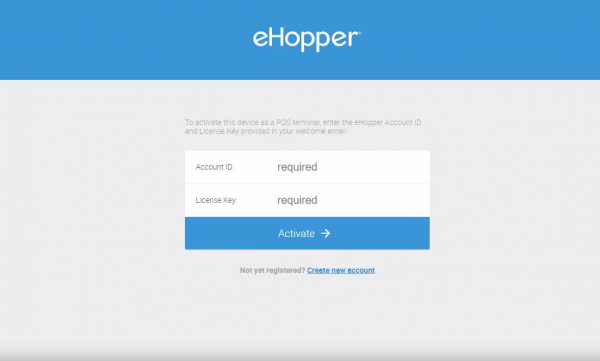
Log in to POS by entering your Account ID and register License Key.
6. On the next screen, enter your PIN # (also found in welcome email) to log in to POS.
7. Accept the Terms & Conditions and tap Submit.
8. To log in to Back Office, open a Google Chrome browser and navigate to bo.ehopper.com. Then, enter the Account ID from your welcome email, followed by the email and password you entered upon signup.
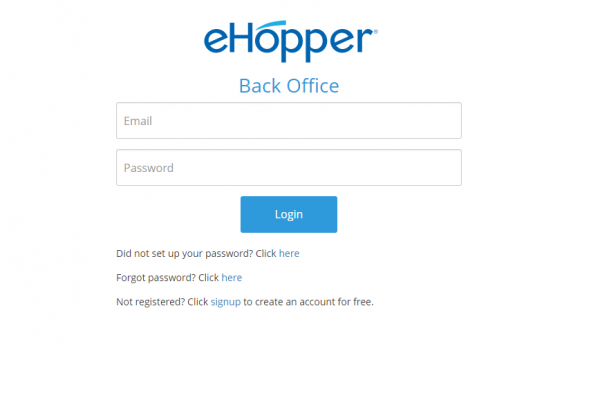
Log in to the eHopper Back Office be entering your email and password.
9. In Back Office, go to Settings in the left navigation menu and then select Company Settings to configure settings for your company and Store Settings to configure settings for your store. For more information, please see https://portal.ehopper.com/portal/en/kb/articles/company-settings and https://portal.ehopper.com/portal/en/kb/articles/store-settings
10. Manage your taxes from the Tax Agencies and Tax Manager sections, your vendors from the Vendors menu, and your employees after selecting Employees. See Adding Taxes with Tax Agencies and Tax Manager, Vendor Management, and Adding, Reviewing, and Editing Employee Info for more information.
11. To set up inventory, go to the Inventory section and create your Departments, followed by your Categories, and then finally your Products. Products can also be imported all at once from a .csv file. You are able to specify which products you would like to appear on the eCommerce site. Please see Creating a Product and Importing Inventory for more info.
12. To install the Woocommerce Integration app, go to the App Directory in the left menu, select the Woocommerce Integration app, followed by the Buy button.

Install Wocommerce Integration App.
B. Create and Set Up Amazon Lightsail Account
1. If you have an Amazon AWS account, log in. If you do not yet have an account, create one at https://aws.amazon.com and then log in.
2. Click the Services tab, followed by the Lightsail option.

Log in to your AWS account and select the Lightsail service.
3. Choose your preferred language for use of Lightsail.
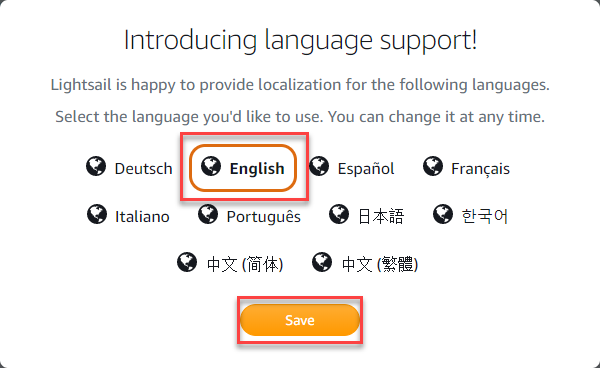
Choose your preferred Lightsail language.
4. The next step is to create an instance. First, select your instance location. It is best to choose a region that is closest to most of your potential customers so they will experience less latency.
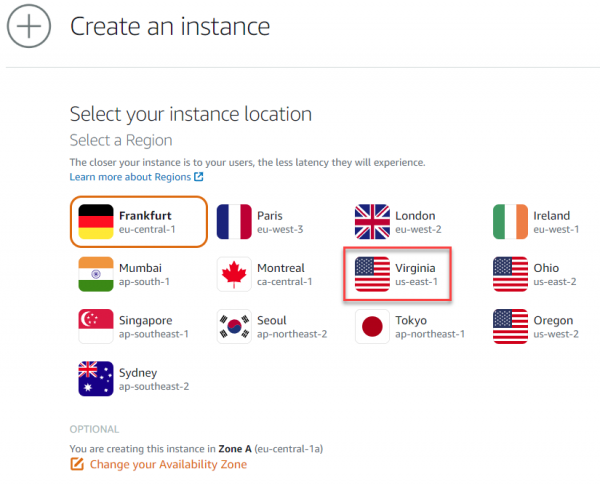
Choose an instance region that will cause the least latency for majority of your customer-base.
5. Next, select Linux/Unix as your instance platform and Plesk Hosting Stack on Ubuntu as the blueprint.
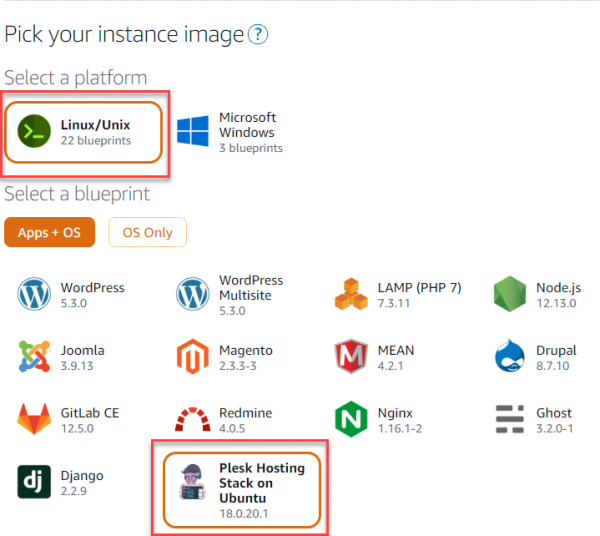
Choose your instance platform and blueprint.
6. Choose to enable automatic snapshots in order to create backup images of your instance, and then specify the daily time that the automatic snapshots will be executed.
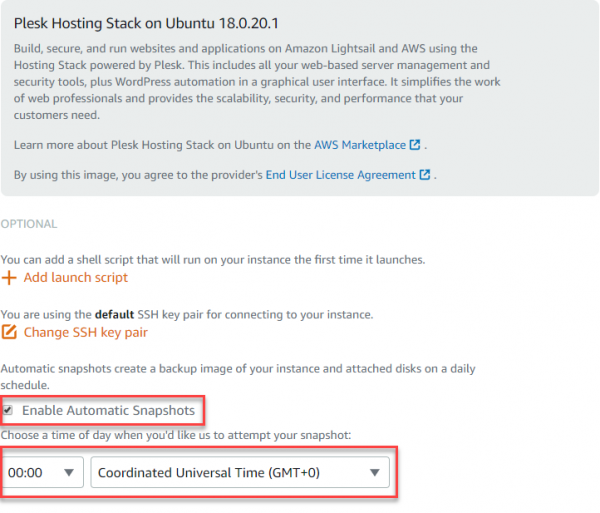
Create backup images of your instance by enabling automatic snapshots.
8. In the SSH key pair manager section, choose the Default key pair for the SSH into your instance and then select Download to download the key pair to your files (will be uploaded later).
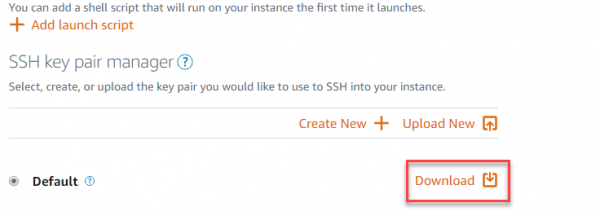
Download the default key pair to your files so it can be uploaded later to SSH into your instance.
9. Next, choose your instance pricing plan depending on your preferred server memory, processing, storage, and transfer for the instance.

Select your preferred instance pricing plan.
10. The final step to create your instance is to enter your instance name in the Identify your instance section, and then select the Create instance button.
11. Wait until the instance status is Running and then select the instance.
12. Within the Connect tab of the instance, copy and paste the Public IP and User name in a separate text file to save for connecting to your instance later, once your SSH client is set up.
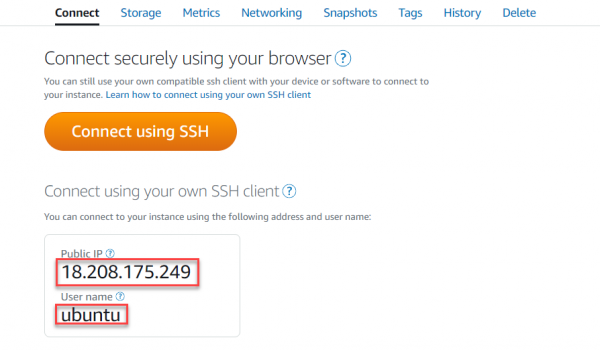
Save the instance Public IP and User name for connecting to your instance once the SSH client is set up.
13. In order to set up an SSH and SCP client, you will first need to locate, download, extract and install it. In this example, we will use MobaXterm.
14. Once the SSH client is installed, open it and select Session, followed by SSH.
Open the SSH Session, once your SSH client is installed.
15. In the Remote host field, enter your previously saved Public IP.
16. In the Advanced SSH settings section, click the Use private key checkbox and then select the file icon in the field. Find and select the previously downloaded default key pair in your files and then click OK.
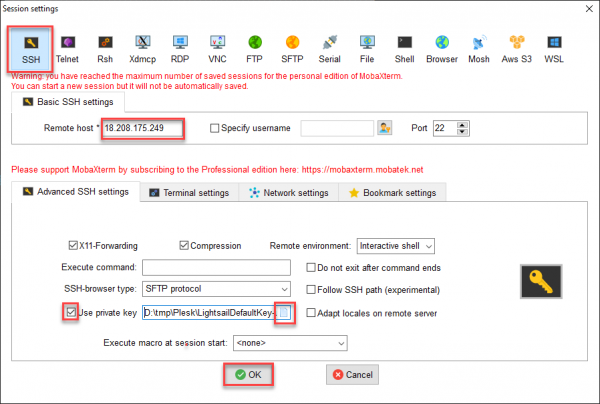
Upload the previously downloaded default key pair from your files in the Use private key field.
17. If the previous step was successful, a “login as” prompt will appear. Type your previously saved SSH client User name and then press the enter key.
18. Next, type sudo plesk login and then copy one of the links below it for the Plesk hosting site. Paste it in an internet browser press the Enter key.

Type “sudo plesk login” in order to access and open the Plesk hosting site URL.
19. On the web page that appears, click Advanced, followed by “Proceed to unsafe”
20. On the Plesk site, enter your contact information in the fields and create a user name and password for later use. Click the Enter Plesk button to access your Plesk administration panel.
21. In the Websites & Domains section on Plesk, click the Add Domain button.
22. If you do not yet have a domain, you will need to first register for one. Then, fill in all the fields in the Adding New Webspace section to point your domain/subdomain to the Public IP of the Plesk instance you created earlier. To create a free SSL certificate for your domain, select the Secure the domain with Let’s Encrypt checkbox. Click the OK button when done to officially add your domain to the Plesk administration panel.
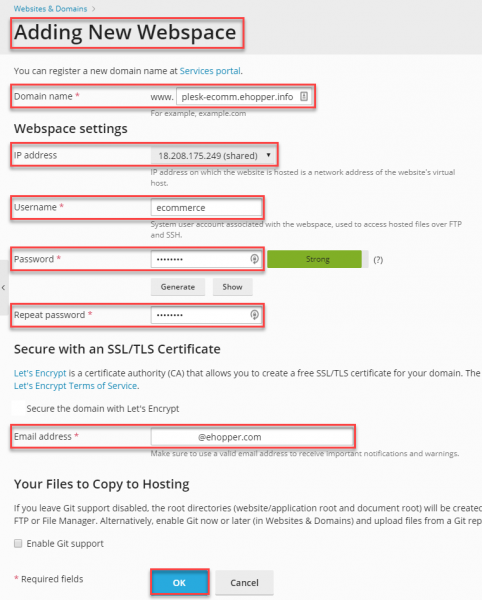
Point your domain to the Public IP of the Plesk instance, create a free SSL certificate, and add your domain to Plesk.
C. Install WordPress and WooCommerce on Lightsail
1. Once the domain is added, the next step is to install a WordPress site on Plesk. In the Websites & Domains section, click Install WordPress.
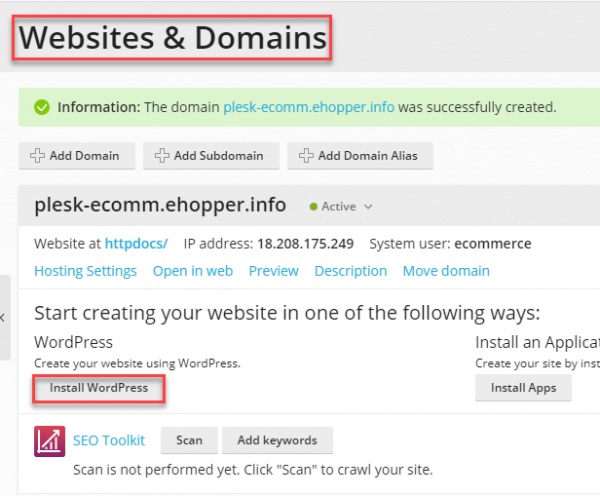
Install WordPress on the plesk hosting site.
2. In the WordPress Administrator section of Plesk, create a Username and Password for WordPress, and enter a valid email address.
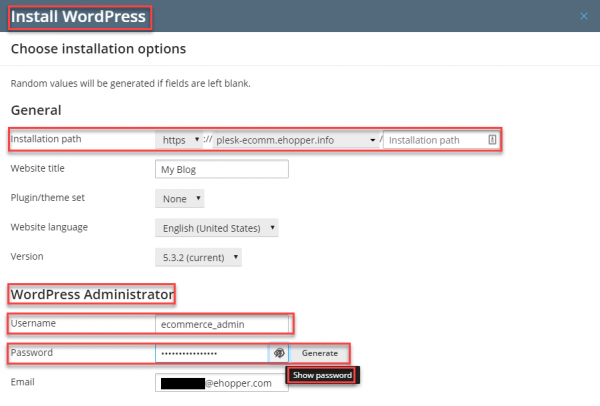
Create a Username and Password for logging into your WordPress site.
3. Then, expand the Database section and enter ecommerce as the WordPress Database name and eh_ as the Table prefix. Choose any Database user name and Database name that you would like and click Install to install WordPress.
4. Once the installation of the WordPress site is complete, it will take you to the WordPress Toolkit.
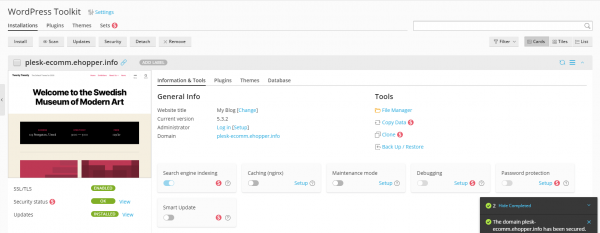
Once installed, you will be navigated to the WordPress Toolkit.
5. Next, download the eHopper eCommerce WordPress installer here: Download
6. Reopen your SSH and SCP client (MobaXterm in this example) and type /tmp/ in the left pane of the SCP session and then press the Enter key.
7. Click the Upload to current folder icon (upwards arrow) and then select the eh-ecommerce installation file to download it to the Plesk server.
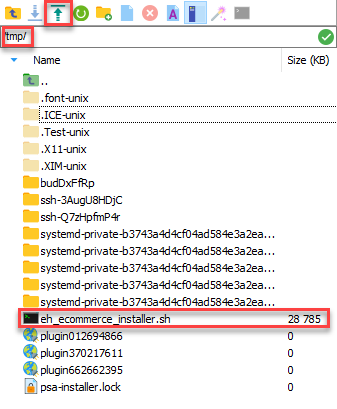
Upload the eHopper eCommerce WordPress file to Plesk.
8. In the console on the right side, type the following terminal commands, pressing the Enter key after each one:
a. sudo chmod +x /tmp/eh_ecommerce_installer.sh
b. cd /tmp
c. sudo ./eh_ecommerce_installer.sh
9. Follow the installation process instructions that appear in the console, including re-entering your Plesk database name, user name, and password.
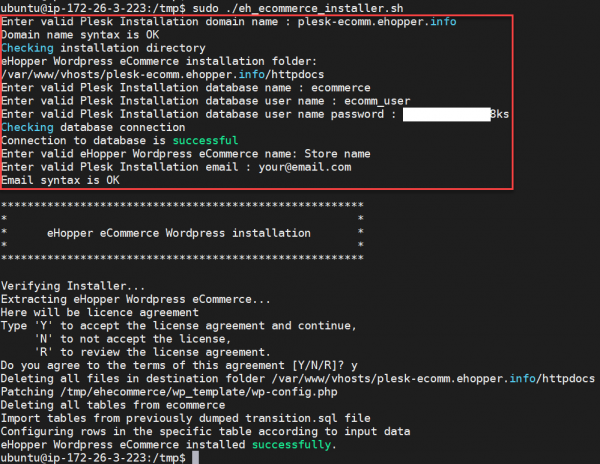
Follow the eHopper eCommerce WordPress installation instructions in the console.
10. If the above was performed correctly, you should see a message in the console that says “eHopper WordPress eCommerce installed successfully.”
11. Now that eHopper WordPress eCommerce is installed, go back to your Plesk administration panel, select Websites & Domains, followed by Your WordPress installation for eHopper WordPress eCommerce- and then click the Refresh button.
12. You can now go to “https://your Plesk WordPress domain/ wp-admin/” in a web browser to start managing your eHopper WordPress eCommerce site.
13. Once you have accessed the WordPress site, go to Settings, followed by Reading and then uncheck the Search Engine Visibility checkbox to start indexing your site on the internet. Click Save Changes.
14. Your default eHopper WordPress eCommerce credentials are:
a. Username: admin
b. Password: WjoMJmFCYXTD#KEjFWAK4jCY
D. Connect eHopper POS with WooCommerce
1. Return to your eHopper Back Office at bo.ehopper.com and then select the eCommerce section under Apps in the left menu.
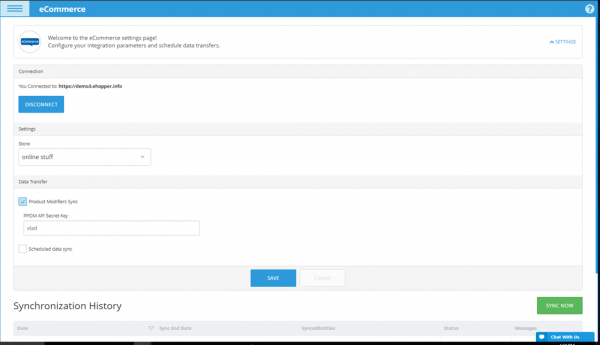
Set up the synchronization between eHopper and your WooCommerce site on the eHopper Back Office.
2. Enter your WordPress URL in the field and click Connect to connect the site to your eHopper account.
3. Select the SYNC NOW button to sync all inventory data from your eHopper account that you specified to be added to eCommerce onto your WordPress site. If you would like eHopper to automatically sync with eCommerce at a daily scheduled time, check the Scheduled data sync checkbox and then choose a time.
4. For more information about connecting eHopper with eCommerce, please see eCommerce and Online Ordering Integration
Update: In addition to Amazon LightSail, we successfully tested the eHopper and Woocomerce on WordPress integration on Godaddy, and 1and1.com hosting services.
Conclusion and Next Steps?
Especially at this time, as a business owner, it is crucial that you have an online presence in order to effectively adapt, so you can maintain your service to your customers and keep revenue coming in. eHopper and WooCommerce provide all the tools you need to accomplish this and to accommodate businesses in the current environment. Getting started is easy. Simply visit https://ehopper.com/online-ordering-system/ and fill out the online ordering request form. You will be able to start using the system instantaneously, as we will provide you with easy to use, intuitive software and easy to follow instructions.