How to Set Up eHopper POS with QuickBooks
Overview
Are you a business owner or operator who is using QuickBooks Online? Are you looking for a point of sale software that seamlessly integrates with QuickBooks? If yes, then this post is for you!
What is QuickBooks?
QuickBooks is an accounting software designed to meet the needs of small and medium-sized businesses. QuickBooks products offer on-premise or cloud-based versions, both of which accept invoice payments, manage bills, and payroll functions.
What is eHopper POS?
A powerful business tool, eHopper POS helps businesses succeed and streamline operations with a large array of features. These features include inventory management, customer management, employee management, EMV payments integration for both online and offline transactions, loyalty program options to encourage repeat customers, and self-serve kiosks, all of which can be customized to the needs of your business. eHopper is ideal for multiple types of businesses, including hospitality and retail, and is intuitive and easy to use. It is also cross-platform, as it is available on eHopper All-in One devices, Android 4.4+ tablets, iPads, Windows 10 PCs, and the Poynt terminal.
How do I connect POS to QuickBooks?
eHopper POS is integrated with QuickBooks Online Plus accounts, so that users can automatically synchronize their sales, inventory, and revenue data. This eliminates the need for manually inputting your eHopper POS information into your QuickBooks account.
Requirements for integration
· You must have an eHopper Freedom, Restaurant, or OmniChannel account. To register, visit https://ehopper.com/pricing/
· You must have a QuickBooks Online Plus Account. · QuickBooks Online currently integrates with eHopper in the U.S., United Kingdom, and Australia.
· When you sync eHopper with QuickBooks, each department, category and item must have a unique name.
· If you disconnect and then reconnect Quickbooks, the data in eHopper will duplicate.
Prerequisites to integrate Quickbooks
1. Sign Up for QuickBooks
2. To start using QuickBooks, register at https://quickbooks.intuit.com.
Note: Only a QuickBooks Online Plus account will allow you to synchronize and work with eHopper.
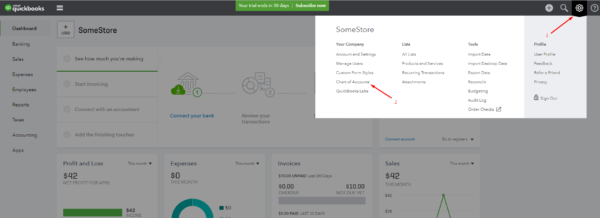
3. Log in to your account.
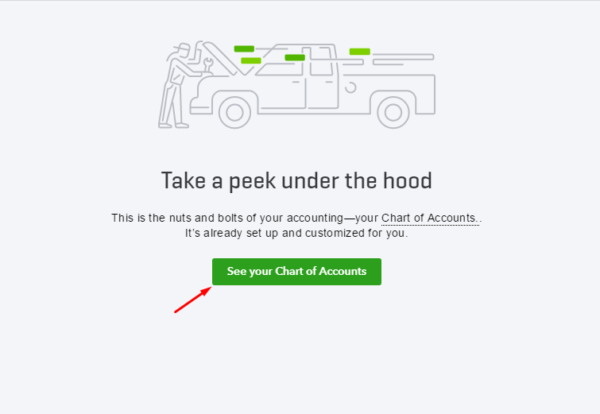
4. On the next page, click on the See your Chart of Accounts button
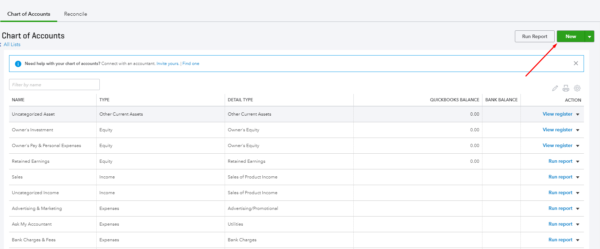
5. Create Business Accounts
· On the Chart of Accounts page, you can create business accounts or use existing ones. To integrate properly with eHopper, you will need to have specific Bank, Asset, Income, Liability, and Expense accounts set up.
1. Click on the button New in the top right corner.
2. Select the account category in the Category Type drop-down.
· When creating a Bank account, select Bank.
· When creating an Asset account, select Other Current Assets.
· When creating an Income account, select Income.
· When creating a Liability account, select Other Current Liabilities.
· When creating an Expense account, select Costs of Goods Sold.
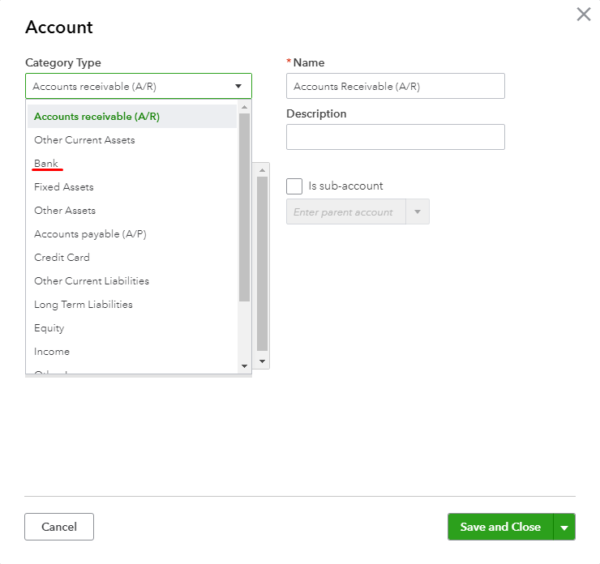
3. Select the Detail Type in the drop-down.
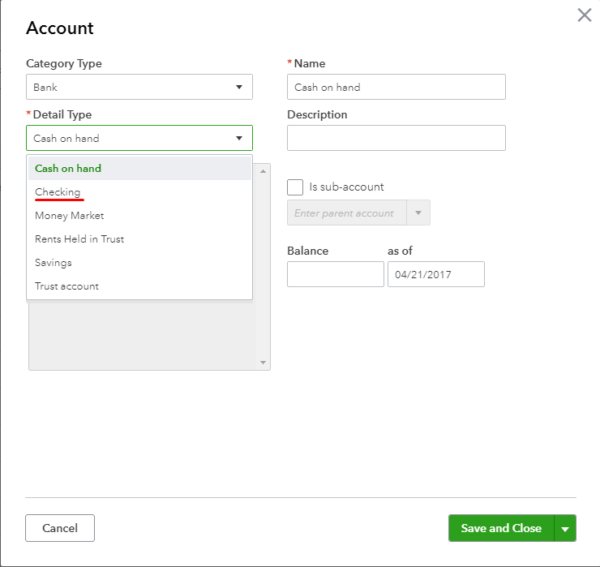
· If your Category Type was Bank, select Checking.
· If your Category Type was Other Current Assets, select Inventory.
· If your Category Type was Other Current Liabilities, select Other Current Liabilities.
· If your Category Type was Income, select Sales of Product Income.
· If your Category Type was Costs of Goods Sold, select Supplies & Materials – COG.
4. Select a name for the account in the Name field.
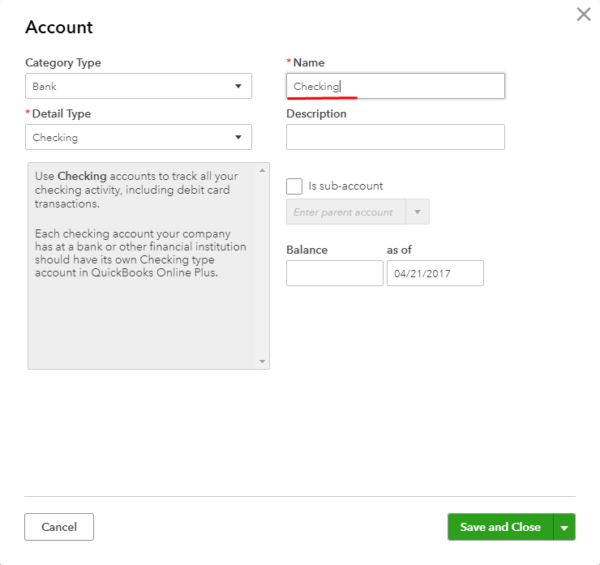
5. After you have filled out all the necessary data for the account, click on the Save and Close button.
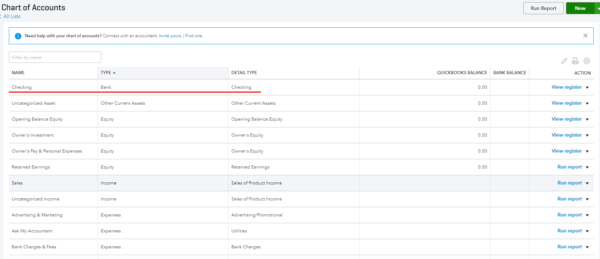
· The created account will be added to the list of all accounts.
Instructions
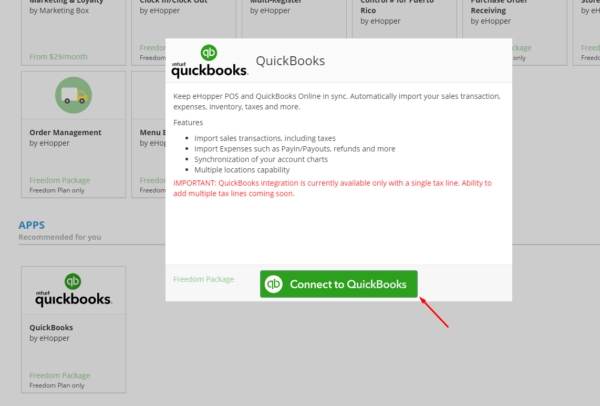
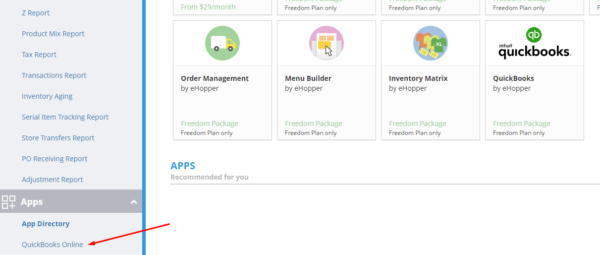
1. Go to Apps—>App Directory in the left navigation menu.
2. Select the QuickBooks app and then click the Connect to QuickBooks button.
3. In the Sign in pop-up window, enter your Email or user ID and Password that you filled out during the registration on the QuickBooks website.
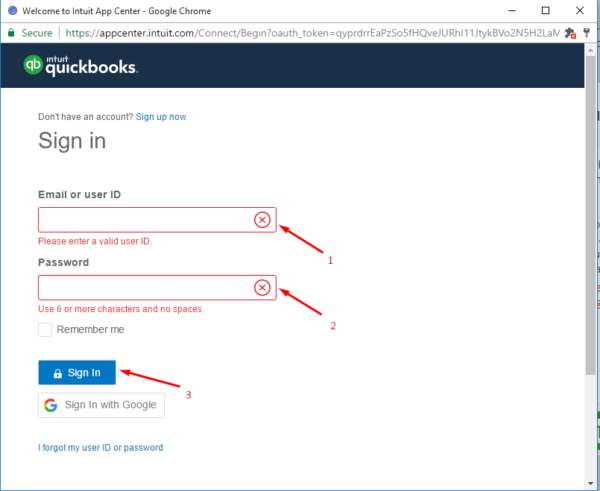
4. Click on the Sign In button.
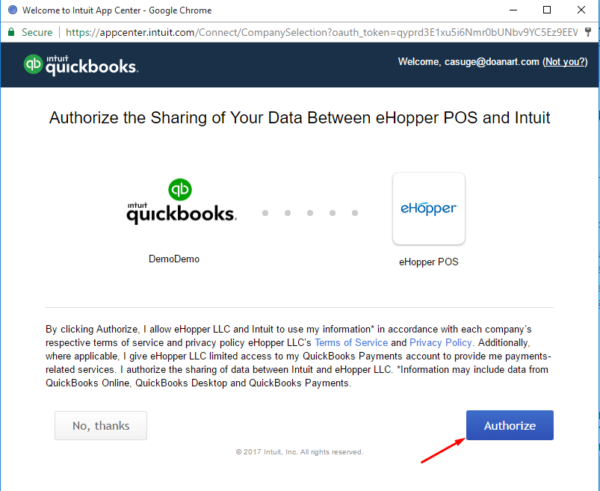
5. On the next page, click the Authorize button.
6. Click Apps—>QuickBooks Online in the left navigation menu
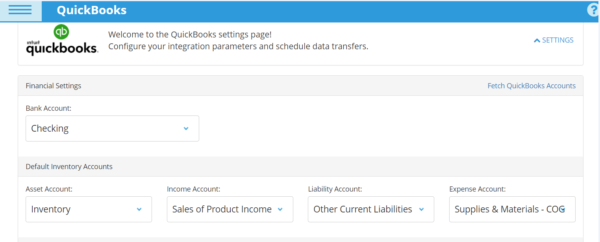
7. Select the Bank Account, Asset Account, Income Account, and Expense Account that you set up in QuickBooks. The chosen accounts should be identical to those in the screenshot below.
8. Determine whether you would like a Scheduled Data Sync to occur between eHopper and the chosen QuickBooks accounts by checking the box. Then, select the time you would like the sync to occur in the drop-down. Leave the box blank if you would not like such a sync.
Note: Currently, scheduled data sync only works in UTC time zones, which you can check online to map to your local time zone.
· If new accounts have been created in QuickBooks since connecting QuickBooks with eHopper, select Fetch QuickBooks Accounts on the top right of the screen.
9. Click the SAVE button.
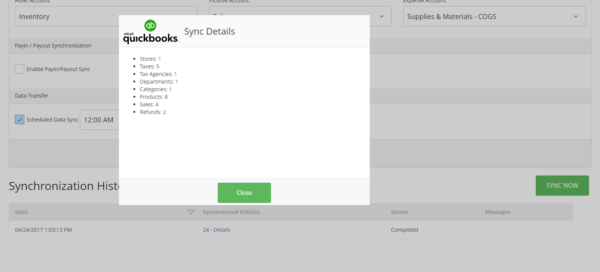
10. To sync eHopper with QuickBooks click the SYNC NOW button.
· Click Details in Synchronized entities to view all the synchronized data.
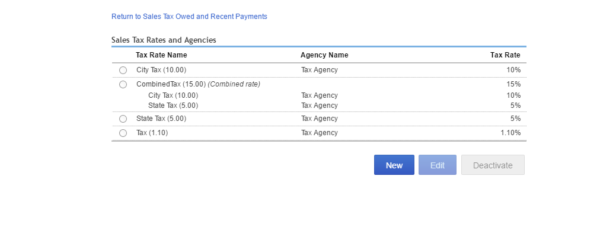
Note: The eHopper software advises that new taxes be created instead of editing an existing taxation for improved integration with QuickBooks. (otherwise, single taxes in QuickBooks will contain brackets with the tax rate, and combined taxes will contain brackets with the tax rate and tax ID).
Potential Syncing Errors
If there are errors after synchronization, you can view them by selecting Errors in the Messages column under Synchronization History. To fix these errors, select Fixes and re-synchronize. Potential errors may occur due to:
· Syncing large amounts of data during first sync
· If you are not using a QuickBooks Plus Account
· If you selected an Account Type that does not integrate with eHopper (shown above)
· If a department and category in eHopper share the same name
· If you changed your eHopper store name to one already created in QuickBooks. You can do the opposite and change your QuickBooks store name to match your eHopper one.
Setting Up Sales Tax Rates on QuickBooks
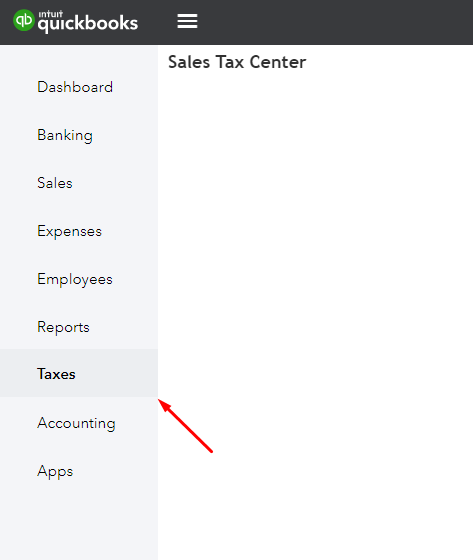
1. In the main menu of your QuickBooks account, select Taxes.
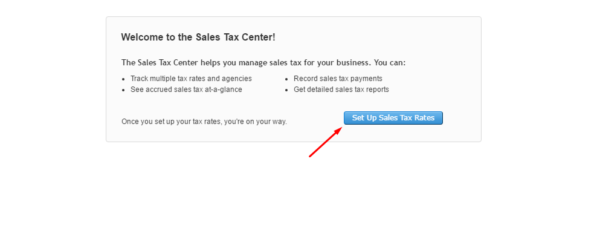
2. Click the Set Up Sales Tax Rates button
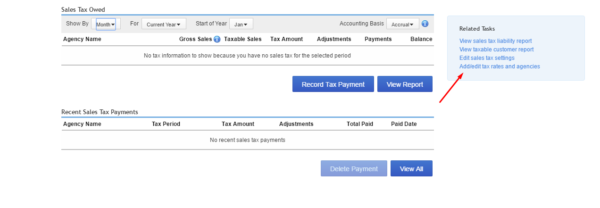
3. Select Add/edit tax rates and agencies
4. Select the New button
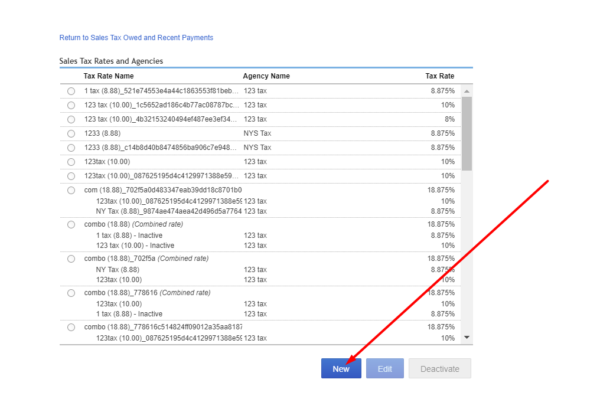
5. Choose either to add a Single tax rate or a Combined tax rate by selecting the circle to the left of the option.
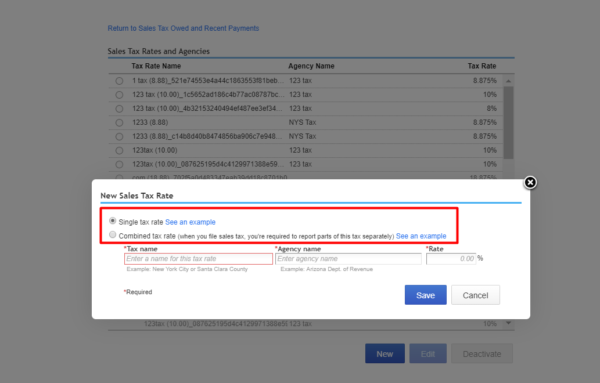
6. Input the Tax name, Agency name, and Rate into the respective fields.
· You can Edit or Deactivate a tax at any time by selecting those buttons respectively.
7. Select the Save button.
8. In eHopper’s Back Office, go to Apps—>QuickBooks Online and then select the SYNC NOW button.

· The taxes and their information should now be imported into eHopper POS.
Importing Tips on QuickBooks
1. Once you arrive at step 2 in the Create Business Accounts section above, choose Other Current Liabilities as the Category Type and Detail Type in both of those respective drop-downs/
2. In the Name field, enter either Gratuity or Tips.
· Leave the Balance field blank.
3. Click on the Save and Close button.
· Tips from transactions will be imported and will appear as an additional line item in QuickBooks as seen in the image below.

· When you open a sale with tips in QB, it appears as Name: Tip Type: Service
If QuickBooks Security Token Expires
· It is possible that your security token for QuickBooks could expire. If this is the case, you will be notified on the QuickBooks page in eHopper and will be given the option to Reconnect to QuickBooks by selecting the button. The token will then be refreshed.
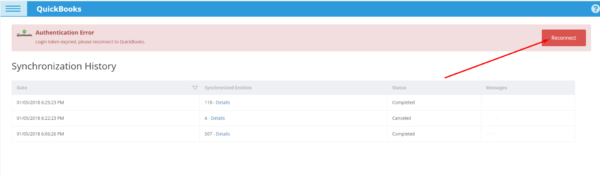
· It is possible you may get logged out of QuickBooks instead. If this is the case, simply log back in and perform a manual sync in eHopper and the issue should be resolved.
Conclusion
The eHopper POS solutions featured in this article serve as a starting point if you are looking for systems that integrate with QuickBooks Online. Businesses that integrate their POS with a QuickBooks account eliminate the need to manually input data, which reduces mistakes and improves efficiency, so they will have more time to focus on other tasks. . Integrating QuickBooks with eHopper POS will help you manage your business’s profit and loss, amortize payroll taxes, track sales tax collected, and record mileage for tax deduction purposes.
Get Started with Syncing your QuickBooks Account with eHopper Today, for More Streamlined and Efficient Operations!