

How to Use eHopper Self Serve Kiosks to Utilize Contactless Payments to Increase Safety
How would you like to grow revenue, cut costs, and increase safety at your business during this new normal? This is possible with the eHopper self-serve kiosk solution!
With the eHopper self-serve kiosk, your customers will be able to order and checkout completely on their own, without staff assistance or additional resources. As a result, you will be able to:
a) Increase safety from Covid-19 by minimizing contact between customers and staff.
b) Increase sales by dramatically decreasing wait times and providing a more seamless and interactive shopping experience.
c) Free up your payroll budget
In this guide, we will review the following:
1. Best Practices for Use of Self-Serve Kiosk to Increase Safety
2. eHopper Self-Serve Kiosk Setup in Back Office
3. Customer Flow of eHopper Self-Serve Kiosk in POS
Best Practices for Use of Self-Serve Kiosk to Increase Safety
Though use of the eHopper self-serve kiosk will help prevent spread of Covid-19 by greatly minimizing contact between customers and staff, certain additional precautions should be taken to prevent further spread between customers, as customers will frequently be touching the self-serve POS screen to enter their orders.
The CDC recommends that frequently touched surfaces like these be cleaned on a regular basis (depending on the level of traffic at your store). For best sanitation, it is advised to follow the steps below:
1. Lightly dampen a soft, lint-free microfiber cloth with a cleaning solution.
Appropriate cleaning solutions for this purpose could simply be a mild soap and water solution, a small amount of hand sanitizer with a combination of 70% isopropyl alcohol and 30% distilled water, or a disinfectant product.
Important: The cleaner must not contain acid, alkaline, or chemicals such as bleach, as this can result in damage to the functionality of the touchscreen.
It is also important to never apply cleaner directly to the surface of the touchscreen and only use by first applying it to the cloth.
An alternative is to just use disinfecting wipes to clean the kiosk, such as Clorox disinfecting wipes, which does not require adding a cleaning solution to the cloth
2. Once the cleaning solution has been applied to the lint-free microfiber cloth, make sure to squeeze out any excess liquid, so the cloth is only slightly damp. If the cloth is too wet, the liquid could seep into the screen or kiosk device and cause damage.
3. Finally, wipe the surface of the touchscreen gently in small circles and make sure that all of the cleaning solution is off of the screen after it has been cleaned.
Additional precautions you can take are to keep hand sanitizer or disinfecting wipes near the kiosks for customers to apply and use themselves, to better keep the kiosk area germ-free.
Other surfaces of the kiosk device should also be cleansed, as well as any peripherals on or near the kiosk, such as a payment terminal.
eHopper Self Serve Kiosk Setup in Back Office
Now that we reviewed the best practices for maintaining safety when using a self serve kiosk, we will guide you on how to set up your self-serve kiosk in the eHopper Back Office in the steps below.
1. First thing’s first, you will need to be on either the Freedom, Restaurant, or OmniChannel Plan. To learn how to upgrade, please see https://portal.ehopper.com/portal/en/kb/articles/creating-upgrading-to-an-ehopper-freedom-restaurant-or-omnichannel-account
2. Then, log in to your Back Office account, and in the left navigation menu, go to Apps—>App Directory and install the Self Serve app.
3. Once the app is installed, select Settings—>Register Settings in the left navigation menu.
4. In the General tab, under Register Mode, select the Self Serve option (the default option will be POS Register).
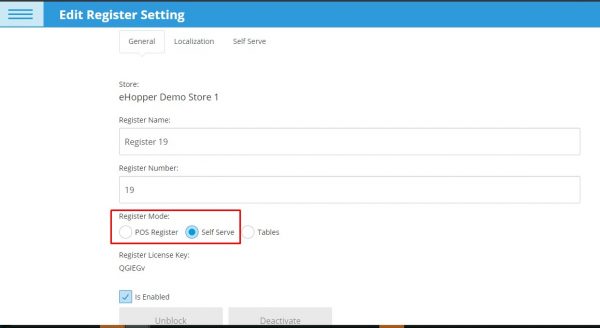
5. After the Self Serve option is selected, a new tab will appear on the top of the page, called Self Serve. Select the tab to configure the settings for the self-serve register.
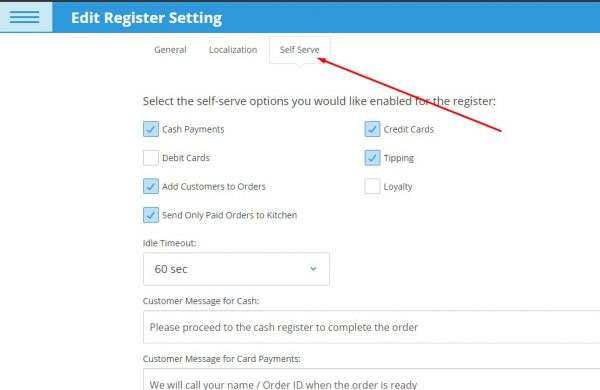
Self Serve Register Settings
6. On this screen, you can choose from the following options for the self-serve register by selecting the checkbox to the left of each that you would like to configure:
• Cash Payments – If selected, cash will appear as a payment option for customers. After ordering on the kiosk, they will be able to pay at the cash register.
• Credit Cards – If selected, credit and debit cards will appear as payment options for customers (if configured) and customers will be able to swipe their card on the terminal.
• Tipping – If selected, customers will be able to enter tips on the screen during card transactions (if tips was configured in Store Settings).
• Add Customers to Orders – If selected, customers will be able to add themselves to orders via the Customers drop-down on the top left of the POS screen. If the Loyalty box was selected, this option must be enabled.
• Loyalty – If selected, loyalty customers will earn points and rewards (after selecting themselves as customers). This option will only appear if the Loyalty app was installed, the loyalty program was added to the store, and the Add Customers to Orders option was selected.
• Send Only Paid Orders to Kitchen – If selected, when an order’s Status is Paid, the kitchen receipt will print. If the order status is Unpaid, the kitchen receipt will not print. When this option is not selected, the kitchen receipt will print for every order, whether paid or unpaid. The checkbox will only appear if the “Kitchen Receipt” box was selected in Store Settings.
• Idle Timeout – From this drop-down, you will be able to choose how much time the POS screen should be idle after not being touched during a customer order. After the time runs out, a popup will appear confirming if the customer is still there, counting down 30 seconds, after which it will return to the main screen and delete the order. The options are 60 sec (default), 90 sec, 120 sec
• Customer Message for Cash Payments and Customer Message for Credit Card Payments (credit and debit) – In these fields, you can enter a customized message that will be shown to customers on the Thanks screen, after they select the corresponding payment type during self checkout.
• Show Splash Screen – If selected, you will be able to upload an image that will be displayed when the POS screen is idle that will say “Touch to Begin Ordering.” If deselected after adding an image, the image will not appear when the screen is idle but it will be saved in if box selected again.
7. Select the Done button to save.
Customer Flow of eHopper Self Serve Kiosk in POS
Once the self-serve register has been set up in the Back Office, customers will be able to use the kiosk to process orders on their own. Below is the flow of the customer experience on the kiosk.
1. If a splash screen was enabled and image uploaded in the Self Serve settings in Back Office, the splash screen uploaded will be displayed and will say “Touch to Begin Ordering.”
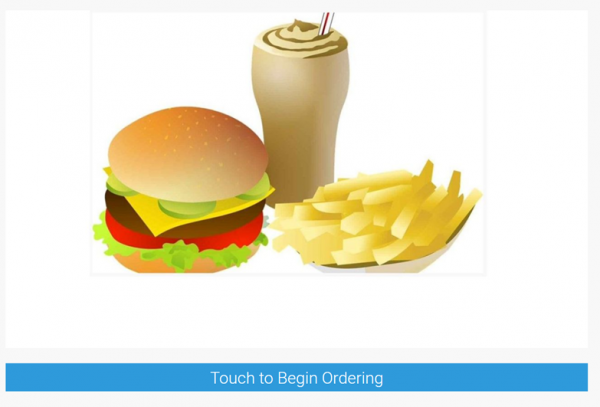
eHopper Self Serve Kiosk Splash Screen
• Once the screen is tapped, the customer will be taken to the main POS screen.
• If the splash screen was not enabled, the customer will first see the main POS screen.
2. If the Add Customers to Orders option was selected in the Self Serve settings in Back Office, the customer can select the Customer field on the top left of the screen and then search for themselves by entering their exact email or phone number in the search field. “Enter your phone or email here“ will be displayed.
3. The customer selects the items they want to add to the shopping cart and they will appear in the left side of the screen.
• To edit the Quantity, Modifiers or Matrix Variant, and Notes of an item, the customer can tap on the product in the shopping cart.
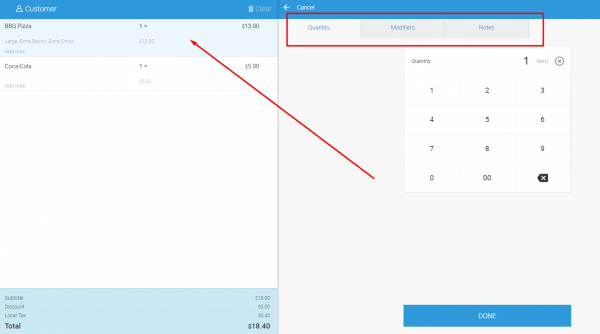
• The customer can view the Subtotal and Total information for the order on the bottom left of the screen.
4. When the customer is finished updating their order and is ready to checkout, they select the Checkout button on the bottom left of the screen.
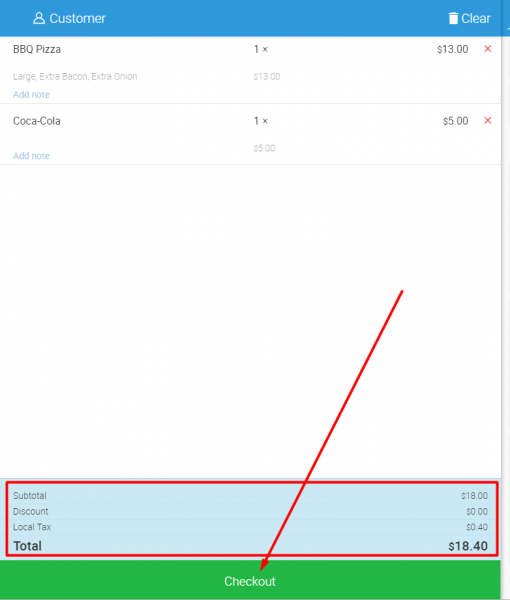
Customers are able to checkout by themselves on the Self Serve Kiosk.
5. They will be navigated to the Choose payment method screen, where they will have the option of selecting any of the payment types enabled for the self-serve register in the Self Serve Back Office settings (Debit Card will only be an option if enabled in the Payment Gateway tab of Store Settings).
6. After a payment type is selected, they will be taken to the Place Order screen. Here, customers have the option of entering their name in the Please Enter Your Name (optional) field.
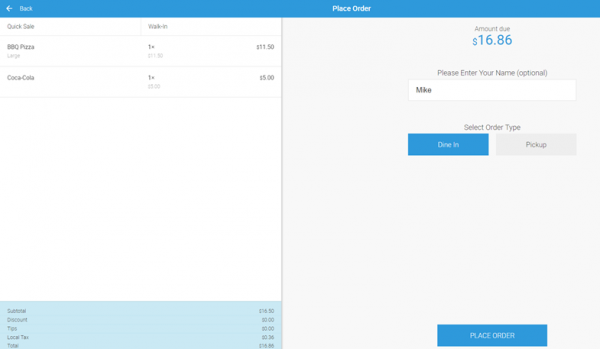
Customers can place their own orders on the Self Serve Kiosk.
• If they already added themselves to the order from the POS screen, their name will automatically appear in the field.
7. If the Ability to Choose Order Type option was enabled in the Back Office Store Settings, under Select Order Type, customers will be able to select either the Dine In (default) or Pickup options.
8. The customer will select the PLACE ORDER button to confirm the order.
9. If the customer selected Credit Card or Debit Card as their payment type, they will be prompted to swipe their card on the payment terminal (the terminal must be properly set up and must be compatible with eHopper). For more info, please see https://portal.ehopper.com/portal/en/kb/articles/pax-terminal-setup-on-ehopper-pos
10. The customer will then be taken to the Receipt screen, which will say “Thank You!”, followed by the last 4 digits of their order number, and the message you customized in Back Office either for cash or credit card payments (depending on the payment type selected).

Self Serve Kiosk Receipt Screen
• If a receipt printer was set up on the kiosk register, the receipt will print on this screen as well. For more info on setting up receipt printers, please see https://portal.ehopper.com/portal/en/kb/online/hardware/printers
Conclusion
As demonstrated in this guide, the self serve kiosk will enable you to relieve a significant amount of your daily tasks and resources by automating the sales process.
You can utilize self-serve kiosks with eHopper point of sale to not only allow for a much more seamless sales and ordering process for you and your customers, but also increase sales and grow revenue, cut costs by freeing up your payroll budget, and increase safety at your establishment by minimizing contact between guests and staff.
All that is required to implement is to acquire a kiosk device and set up the self-serve kiosk register in your eHopper Back Office account. Afterwards, customers will be able to checkout items completely on their own, freeing you up to focus more on growing business.
Get started with eHopper today to take advantage of the self-serve kiosk, among a suite of other features that will help increase your revenue and profits and allow for more seamless operations.
")


