How to Get FREE POS and FREE Processing (Updated 2025)
Using a modern point of sale system that has the ability to accept credit cards is a sure way to grow your business. Historically, this has added up to thousands of dollars in software, hardware and processing costs. With the progress of technology, cloud-based POS systems, and the changes in laws, the cost has gone down dramatically. But how would you like to completely eliminate the cost? Here are the steps on how to get FREE POS and FREE processing.
1. Sign up for an eHopper POS plan
2. Sign up for free processing with eHopper POS
1. Sign up for an eHopper POS Plan
Before you can take advantage of free processing with eHopper POS, you will first need to create an eHopper account and choose your preferred plan.
Note that eHopper is currently running a promo where if you sign up for free processing, you will receive the Freedom or Restaurant plan completely FREE! Don’t miss out on this limited time offer!
eHopper Plan Options
There are three plans available with eHopper:
• Freedom Plan: contains features for retail, QSR or services.
• Restaurant Plan: contains all Freedom plan features plus table management. This plan works best for restaurants with dining in options.
• OmniChannel Plan: Contains all the features of the Restaurant Plan, along with an integrated online ordering site, loyalty program, marketing apps, and digital signage.
Sign Up for eHopper Plan Without a Pre-existing Account
If you do not yet have an eHopper account, you can sign up for a specific plan by following the below steps:
1. Go to https://ehopper.com/pricing/, scroll down to where it says Sign Up and select the package that you would like to create an account for.

2. On the form, fill out your account information, followed by your payment information.
3. You will receive a Welcome email with your log in credentials.
• You will also receive an email from the eHopper Support team to set up an implementation and training session with you.
Upgrade an Existing Account to a New Package
If you already have an existing eHopper account and would like to upgrade to a more advanced version, please follow the below steps.
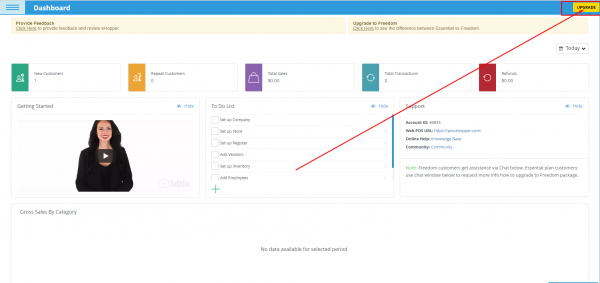
1. Visit https://bo.ehopper.com/ in a Google Chrome browser and log in to your Back Office by entering your Account ID and License Key (provided in your Welcome email), followed by your Email and Password, which you entered upon signup.
2. On the Dashboard, select the Upgrade button on the top right of the screen.
3. The Payment page will open in a Google Chrome browser window. Fill in your name and credit card information.
4. Select the Complete button to confirm the upgrade purchase.
• When you return to Back Office, you will be on the upgraded version of your account.
• You will receive an email from the eHopper Support team to set up an implementation and training session with you.
2. Sign Up for Free Processing
The average credit card processing fee is 2.6% +$0.30 per transaction. Wouldn’t you like to process credit and debit cards at 0% processing fees, without any additional fees or commitments? Sound too good to be true? With eHopper, this is possible and 100% legal!
All you have to do to get started is sign up for a cash discount or surcharge program.
What is a Cash Discount?
A cash discount is exactly what it sounds like; a discount that is offered at the time of sale, off the regular sales price(s), to customers who pay with cash. If a customer pays through a payment type other than cash at the time of sale, they do not receive any discount for the transaction and they will be charged the regular sales price.
The idea is that you raise your sales prices by the rate that you are being charged for credit card fees. Then, when customers pay by credit card, they will be covering your processing fees, causing you to save money.
Aside from saving money on processing fees, other benefits of the cash discount program is that it provides your customers with an incentive to pay in cash. It also causes these customers to leave more satisfied by knowing they received a discount. This discount could be the difference in whether a sale occurs or not.
Setting Up a Cash Discount Program
The cash discount program is easy to set up. Unlike surcharges, it is legal in all US states. Also, unlike surcharges, it does not require submitting an application form to your credit card company.
The only real requirement that needs to be followed with cash discounting is that customers must be disclosed about cash discounts at the at the point of entry (through signage at your store location) and at the point of sale (on the receipt).
The good news is that eHopper automatically supplies that information on the receipt once a cash discount program is set up within eHopper.
Setting Up and Using Cash Discount Program in eHopper POS
1. Configure Cash Discounts in Back Office
Before you can utilize the cash discount program in eHopper, you will have to set it up in the eHopper Back Office. To do this, please follow the steps below:
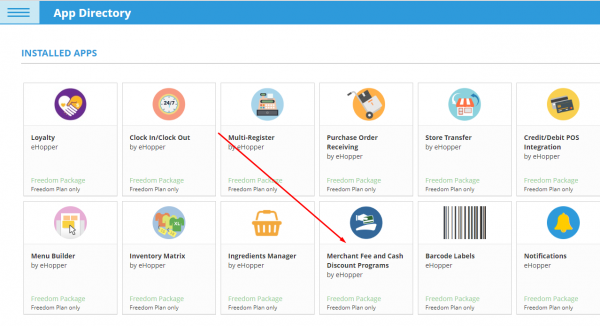
1. Go to Apps—>App Directory and install the Merchant Fee and Cash Discount Programs app.
Note: The Merchant Fee and Cash Discount Programs app cannot be installed while the EBT Card app is installed.
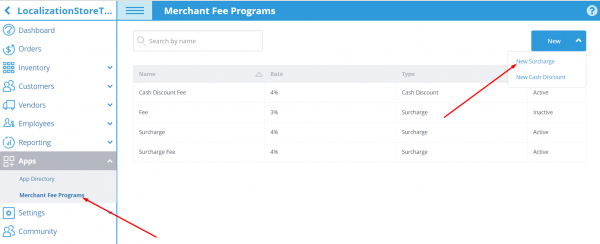
2. Once installed, select Apps—>Merchant Fee and Cash Discount Programs from the left navigation menu.
3. In the upper right corner, select New—>New Cash Discount.
4. Enter the name of the cash discount that will be deducted for all cash and PIN debit purchases in the Cash Discount Name field, and the rate of the transaction total that will be applied as a discount, for cash and PIN debit card purchases, in the Cash Discount Rate field.
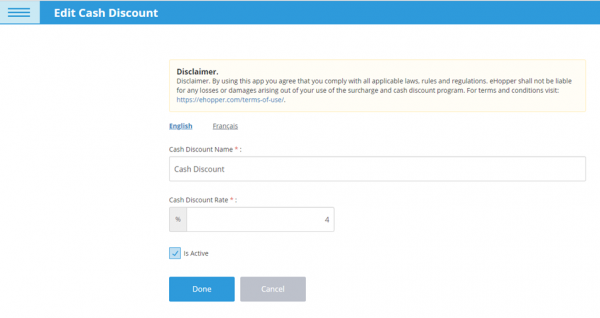
Note: Legally, you should not include a ‘Service/Admin’ fee (or any naming convention) that is offset by the cash discount.
5. Ensure that Is Active is selected and select Done.
6. Go to Settings—>Store Settings—>select the store you want to add the Cash Discount to —>select the Merchant Fee tab.
7. Select the cash discount you want to use from the Name drop-down list.
8. Select Done.
• If you have multiple stores and would like to have a cash discount in each store, repeat steps 7-9 for each of those stores.
2. Apply Cash Discount on POS
Now that your cash discount program was set up in Back Office, you can apply it in the POS. To do so, please follow the steps below:
1. Log in to your POS.
2. Select Synchronize from the left navigation menu or top right of the page.
3. Select product(s)
4. At the time of the sale, if a customer pays via a payment type other than cash or debit card (credit, external payment, etc), no Cash Discount will be provided off the regular sales price (listed credit card price).
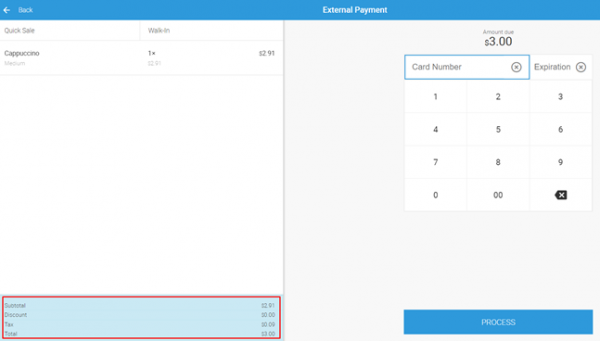 Cash Discount – Non-Cash Transaction[/caption]
• At the time of the sale, if a customer pays by cash or debit card, a Cash Discount will be provided off the regular sales price and the discount will be displayed.
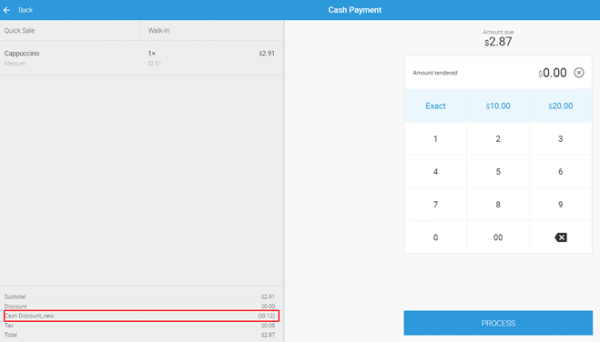
Cash Discount – Cash Transaction
5. Once processed, select to either print or email the receipt. This receipt will display the cash discount if the customer paid in cash. If the customer did not pay in cash, no cash discount will appear on the receipt.
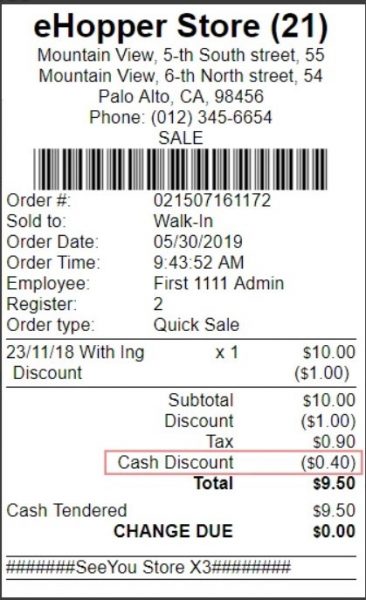
Cash Discount Receipt
What is a Surcharge?
Though both serve the purpose of offsetting credit card processing fees, a surcharges differentiates from a cash discount program in that instead of providing a discount to customers who pay in cash, it charges an extra fee to customers who pay with credit cards.
Unlike with cash discounts, however, it does not require increasing the sales price of your products by the rate that is owed per transaction to credit card companies in order to save on processing fees.
Setting Up a Surcharge Program
Other difference between surcharges and cash discounts come in terms of its setup, as it is a bit more complicated.
For one thing, surcharges are illegal in 5 states: Colorado, Connecticut, Kansas, Maine, Massachusetts, and Oklahoma. In addition, as mentioned earlier, an application must be submitted to your credit card company in advance of adding the surcharge.
• Merchants can submit a notification form to Visa at: www.visa.com/merchantsurcharging
• Merchants can submit a notification to MasterCard at: https://www.mastercard.us/en-us/merchants.html
• Merchants can submit a notification to Discover at: https://www.discoversurcharge.com/
• Merchants do not need to notify American Express for surcharges.
Like cash discounts, surcharges must be disclosed to consumers, both at the point of entry (through signage) and at the point of sale (on the receipt). However, merchants should refer to the specific rules of their credit card company for additional consumer disclosure obligations.
Setting Up and Using Surcharges in eHopper POS
1. Configure Surcharges in Back Office
1. Go to Apps—>App Directory and install the Merchant Fee Programs app.
2. Once installed, select Apps—>Merchant Fee Programs from the left navigation menu.
3. In the upper right corner, select New—>New Surcharge.
4. Enter Surcharge Name and Surcharge Rate. Select the blue switch to choose between either a flat fee or percentage (Rate must not exceed 4%).
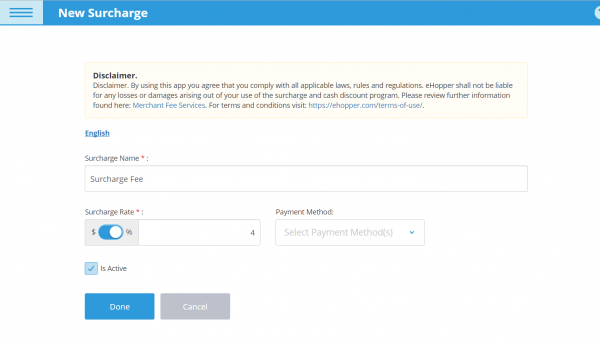
Surcharge Program Setup in eHopper Back Office
5. From the Payment Method drop-down, select Credit Card. (Note: Currently, you need to have a prior authorization from all credit card brands, including Visa and MasterCard to utilize surcharges.)
6. Ensure that Is Active is selected and click Done.
7. Go to Settings—>Company Settings—>Merchant Fee tab.
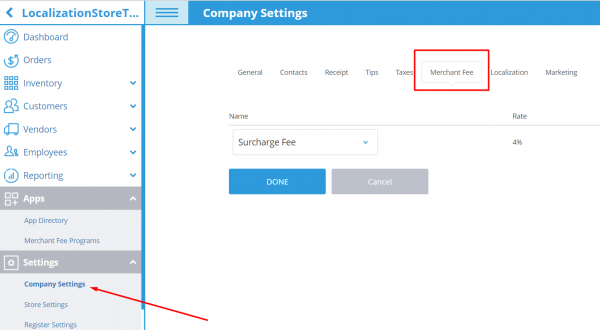
Surcharge Setup in eHopper Company Settings
8. Select the surcharge you want to use from the drop-down list.
9. Select Done.
• Follow steps 7-9 for each store, with selecting Store Settings from the Settings menu.
2. Apply Surcharges in POS
1. Log in to POS.
2. Select Synchronize from the left navigation menu or the top right of the page.
3. Select any product(s) and the system will display the surcharge fee that you set up automatically.
4. Select a payment method.
• When surcharges are added to a store in Back Office, Signature Debit Cards appears as an additional payment option and Debit Card is renamed to PIN Debit Card (if debit cards are enabled in Back Office Settings). When a customer uses a signature debit card, select that option as opposed to Credit Card. This needs to be done because surcharges are not allowed to be added to Signature Debit Cards (only Credit Cards).
• If a customer pays via Credit Card, eHopper POS will add a surcharge fee to the order price by default.
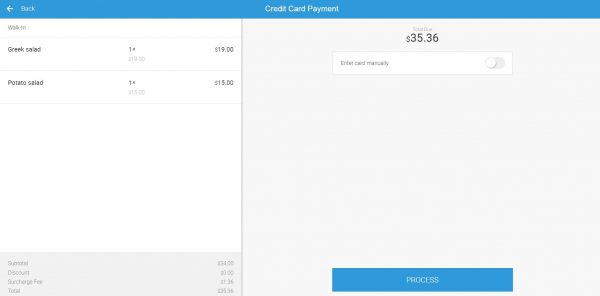
Surcharge for Credit Card Transactions
• If other payment types are used, such as Cash, PIN Debit, Signature Debit, EBT, or External Payment, the surcharge will not be added and the transaction will be processed as usual.
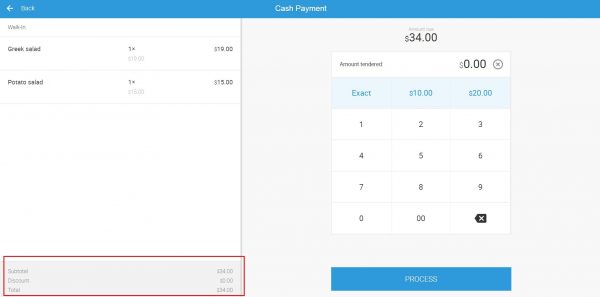
No Surcharge Added for Non-Credit Card Transactions
5. Once processed, select to either print or email the receipt. This receipt will include the surcharge, if the fee was added. Receipt from Credit Card Payment Receipt from Non-Credit Card Payment:
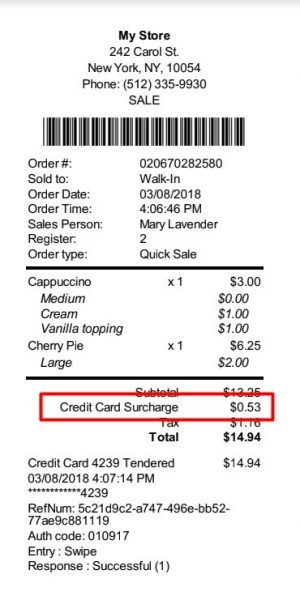
Surcharge Receipt – Credit Card Transactions

Surcharge Receipt – Non-Credit Card Transactions
3. Test drive eHopper for free
To sign up for an Essential account, please follow the below steps:
1. Click on the following link: https://ehopper.com/pricing/ and select Get Started under the Essential plan.
Get Started with eHopper Essential Plan
2. Fill in the necessary info about your business on the eHopper account activation form.
3. Check off I agree with Terms & Conditions
4. Click the Sign Up button.
5. Download the eHopper POS app from either the Google Play (for Androids), the iTunes App Store (for iPads), or download the Windows app from this link.
6. Open the app.
7. Enter your Account ID and License Key, which can be found in the welcome email and tap the Done button.
8. Enter the PIN #, which is also found in the welcome email.
9. Accept the Terms & Conditions and tap Submit.
• You will be logged into your POS.
When you are ready, you can always upgrade to one of eHopper’s paid plans (Freedom, Restaurant, or OmniChannel) to take advantage of its full suite of features and functionalities.
Conclusion and Next steps
As demonstrated in this guide, you can save thousands of dollars on software, hardware, and processing with the eHopper free processing program.
With this program, you will be able to:
• Have FREE processing by accepting cards at 0% processing rates.
• Obtain FREE point of sale software with the eHopper Freedom or Restaurant plan.
You will be able to manage your operations, such as inventory, customers, employees, processing, and much more, with ease, all in one platform!
No additional monthly fees or commitments apply!
Please note this offer is for US customers only.
To get started, simply click here and fill out the form on the bottom of this page. We will then send you an email with the next steps.