How to Set up WooCommerce POS with eHopper and WordPress
Especially nowadays, having an online site is crucial to compete and remain up to date within our current business landscape.
More than ever, consumers are flocking online to make their purchases, instead of buying in person, as they are becoming accustomed to the “new normal” that the Covid-19 pandemic has unveiled.
Luckily, with eHopper, you can utilize an online ordering site through WooCommerce POS, with eHopper and WordPress, that fully synchronizes with your point of sale account, so you can efficiently manage your business operations, both online and offline, all at a very cheap cost.
In this guide, we will review how to set up and use your eHopper online ordering site through WooCommerce integration, so you can quickly and efficiently start selling online, and increase your revenue as a result.
Please see an overview of the steps below:
A. Sign Up for eHopper’s OmniChannel Package and Set Up Account
B. Set Up WordPress Integration with Hosting Service
C. Create eHopper WooCommerce POS Site and Synchronize Data
D. Customer Places Online Order on WooCommerce POS Site
E. New Online Order Sent to POS
What is eHopper POS?
eHopper POS is a cloud-based business solution software that offers a large array of features and functionalities to help your business succeed and efficiently run operations. This includes inventory, customer, and employee management, EMV payments, a fully integrated online and offline solution, loyalty program, self-serve kiosks, and much, much more. eHopper is ideal for multiple business types, including hospitality and retail, and is intuitive and easy to use. It is also cross-platform, as it is available on eHopper All-in One devices, Android tablets, iPads, Windows PCs, and the Poynt terminal.
What is WordPress?
WordPress is an open-source content management system (CMS) that is used to create and manage websites. It is the most popular CMS out there and currently supports over 35% of all the websites on the online web! WordPress is completely free and licensed under GPLv2. It is also very simple to install and set up, with no experience in programming necessary to use.
What is WooCommerce?
WooCommerce is a plugin for WordPress that is also open-source and 100% free. To get started, you can easily install the WooCommerce plugin from your WordPress site and then set up your store in minutes. You are then able to sync your products from your eHopper account to WooCommerce and have them and all their info listed on your eCommerce site, available for sale online, via secure payments.
A. Sign Up for eHopper’s OmniChannel Package and Set Up Account
1. Go to https://ehopper.com/pricing/ and select the Sign Up button under the OmniChannel. You can choose 1 year or monthly.
2. Create your eHopper account by filling out the signup form.
3. After signing up, you will be sent an eHopper welcome email with your account credentials and next steps.
4. Log in to your Back Office by opening a Google Chrome browser and navigate to bo.ehopper.com. Then, enter the Account ID from your welcome email, followed by the email and password you entered upon signup.
5. Start by going to Settings in the left navigation menu, followed by Company Settings to configure settings for your company and Store Settings to configure settings for your store.
6. The next step is to create your products. This can either be done manually by following the steps in Creating a Product or by importing all inventory data at once through a .CSV file. During both methods, you are able to specify which products you would like to sell via the online ordering site.
To save time, you can alternatively send your inventory details to support@ehopper.com for the eHopper Support team to upload into your account (typically will take 1-3 business days to complete, depending on size of menu).
B. Set Up WordPress Integration with Hosting Services
You can set up the eHopper and Woocomerce on WordPress integration with multiple hosting services. The services we have successfully tested so far include Amazon LightSail, GoDaddy and 1and1.com. We will continue to update this article with new tested solutions.
For instructions on how to set up WordPress integration with Amazon LightSail, please see https://ehopper.com/guides/integrate-ehopper-pos-woocommerce/
In order to sign up with GoDaddy, please visit https://www.godaddy.com/
To sign up with 1and1.com, please visit https://www.ionos.com/
To sync eHopper modifiers, please download and install PPOM plugin, here is a link to download
C. Create eHopper WooCommerce POS Site and Synchronize Data
Once you have set up the eHopper and Woocomerce on WordPress integration with your hosting service, the next step is to create your online WooCommerce POS restaurant shopping cart. To do so, please follow the steps below.
1. In the eHopper Back Office, go to Apps—>WooCommerce Integration in the left navigation menu.
2. In the Connection section, enter the eCommerce Site Address URL that you had created within your hosting service and select the CONNECT button to connect the site with your eHopper account.
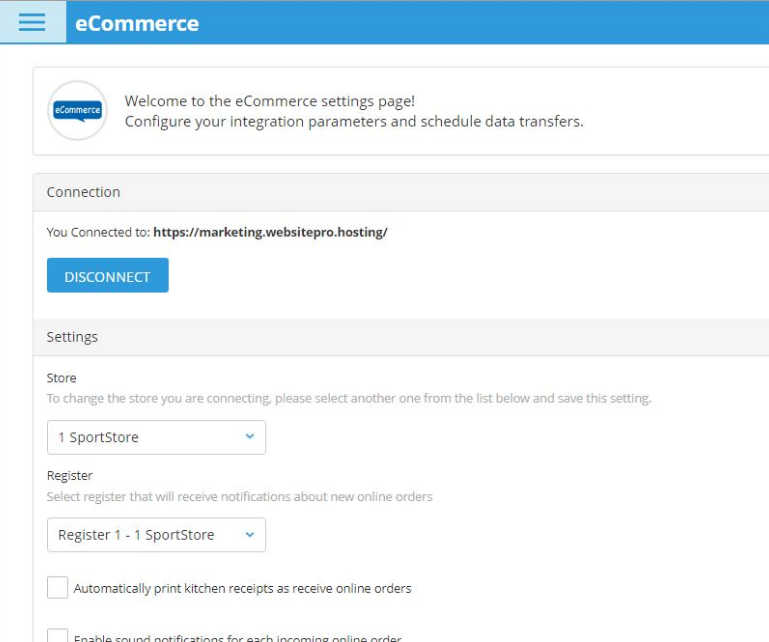
Set up your WooCommerce POS Settings in eHopper.
3. Choose the eHopper Store that you would like the WooCommerce POS site to connect to from the drop-down, followed by the POS Register that you would like to receive notifications to about new online orders.
4. Set up additional settings options, such as enabling sound notifications for new online orders and automatically printing kitchen receipts as new online orders come in.
5. Click Save to save your settings.
6. Finally, select the SYNC NOW button to synchronize inventory data from the eHopper point of sale store to your WooCommerce POS and WordPress site, so that all your POS items and their info will appear on the mobile shopping cart. This includes product names, categories, pricing, modifiers and matrix variants, and even images.

Synchronize your POS inventory data with your WordPress site.
You can select this button to update your site any time you have made changes within the eHopper account. Note that the synchronization may take a few minutes.
To set eHopper to automatically sync with your WordPress site at a daily scheduled time, select the Scheduled data sync checkbox and then choose a time.
Note: If you would like professional website design work done, this is now available for only $379 (reg. price is $2500). Please see https://business.ehopper.com/business-websites/ for more info.
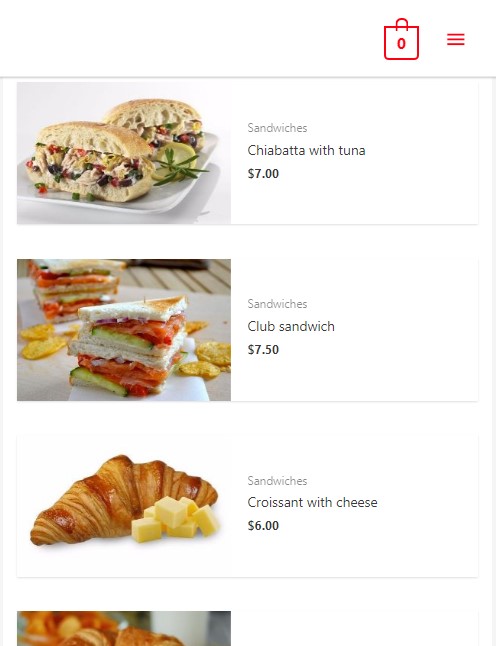
C. Customer Places Online Order on WooCommerce POS Site
Once your WooCommerce POS site is live, your customers can begin placing orders online.
If you already have a website, you can simply add a tab on your home page for customers to navigate to, such as ORDER ONLINE, which will link to the eHopper WooCommerce POS restaurant site for placing orders. If you don’t have a website, you can utilize the WooCommerce site as your main web page.
When customers visit the online shopping cart, they can then select the items and product specifications that they are looking to order by adding them to their basket.
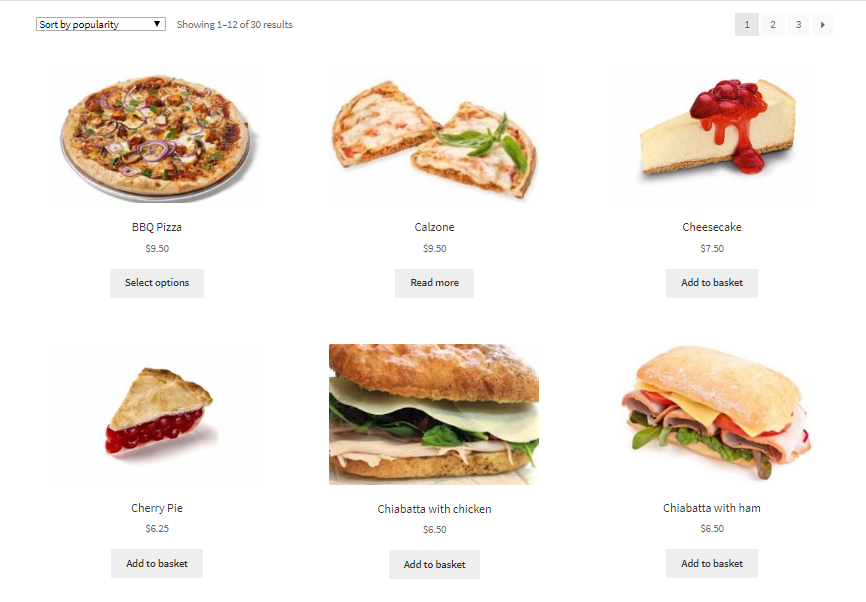
With eHopper online ordering, you can instantly sync your products and product data from your point of sale account to your online site.
During checkout, the customer is then able to either pay directly on your site by entering their card details or merely place the order, for payment at a later time (at store or upon delivery), depending on the payment settings you set on the eCommerce Settings page of your Back Office.
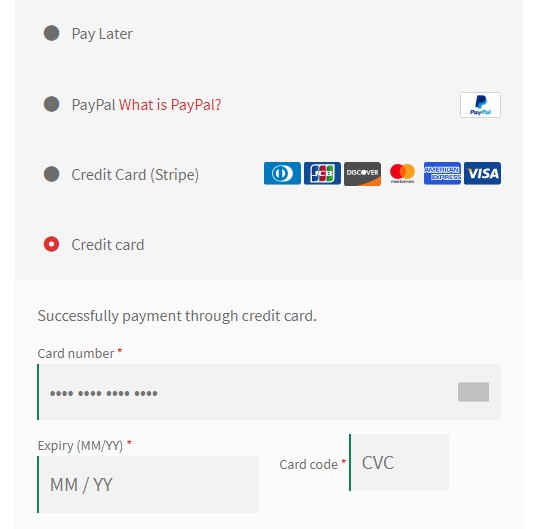
With eHopper online ordering, you can quickly have your site set up to integrate with your existing PayPal, Stripe, or authorize.net gateway accounts.
There are several ordering methods you can set up for your customers through the eHopper WooCommerce POS site.
One of these is for customers to place an order for delivery to their location. When setting up this method, you can specify which regions orders should be allowed to be delivered to, in addition to adding a delivery fee.
Your customers also have the option of choosing to pick up an order at the store location. As mentioned, depending on how you set up your payment settings, customers can either pay directly online for the order and then simply pick up their items when they arrive or pay once they arrive at the store to pick up their order.
Another cool way your customers can order from the WooCommerce POS site is directly at your store by them simply scanning a QR Code, which you can easily create through various free sites, that can be displayed anywhere within your store (such as at a table or storefront), directly from their phones.
Once scanned, the customer will instantly be directed to your digital menu on their mobile devices, from which they can place their order order and enter their credit card details to pay.
E. New Online Order Sent to POS
Once a customer submits an online order from the WooCommerce POS shopping cart, you will be notified in a number of ways.
The first way is you will receive an email notification with all the order details (the customer will also receive an email receipt). As mentioned earlier, you can specify this email address from the eCommerce Settings page in Back Office.
You will also be informed about the new order through a popup message on your POS screen. There will also be an indicator that appears in the POS, in the form of a bell symbol, that will change from grey to yellow when a new online order comes in that has not yet been viewed. You can enable sound notifications for when these orders come in.
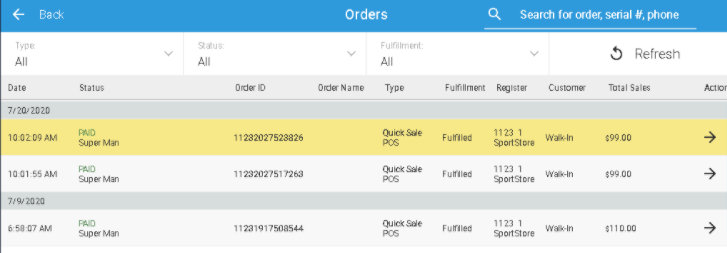
To view all your online orders and their details, simply open the left navigation menu in the POS and go to Online Orders. There, all your online orders will be displayed, with the ones you haven’t viewed yet highlighted in yellow.
Alternatively, you can go to the regular Orders page to view all orders (POS and online), or use the Order Source filter and select Online to view only your online orders.
If the order was placed online, but the payment had yet to be processed, once the customer comes in, you can easily reopen the order from the Order Details screen, and the process the payment.
You are also able to void or refund online orders from the Order Details screen.
Finally, if you have one or more kitchen receipt printers, and have kitchen receipt printing set up in your eHopper account, online orders will be instantly sent to the kitchen printer(s) as soon as they are placed by customers, so your kitchen staff can start preparing them right away. You can also set up the kitchen receipts to display whether the order came from online or from the POS.
Conclusion and Next Steps
Having an online presence, with the ability for customers to place orders remotely is now more important than ever.
Even after the pandemic passes, consumers will become accustomed to ordering online, and will be a lot less likely to order in person than before the pandemic, so it is imperative to get started now so you can properly remain competitive and keep up your revenue flow.
As demonstrated in this guide, you can accomplish this by quickly and easily setting up your WooCommerce POS, with eHopper and WordPress, syncing your product data, and managing your incoming online orders.
Not only that, eHopper offers online ordering functionality at a very affordable cost.
Sign up now for the eHopper OmniChannel Package to remain competitive and grow your revenue!

![How to Choose the Best POS System for Restaurants and Retail [Download FREE POS Comparison Checklist]](https://ehopper.com/wp-content/uploads/free-pos-comparison-checklist-for-best-post-180x180.jpg "How to Choose the Best POS System for Restaurants and Retail [Download FREE POS Comparison Checklist]")