
How to Utilize Restaurant Inventory Management to Reduce Waste and Increase Profit
For many restaurants, managing inventory is critical for optimizing profit margins and reducing waste. According to NRP, food waste from restaurants make up 15 percent of all the food that ends up in landfills.
In addition, managing inventory by hand takes time and is prone to human error. Fortunately, there are technical and very affordable solutions that can help automate the process, as well as provide visibility.
Below are the steps, which will be reviewed in this guide, to take full control of your inventory and increase profits, with eHopper POS software:
1. Sign up for eHopper
2. Set up your account and store
A. Set up vendors
B. Create a menu by creating departments, categories, and products
C. Create products with ingredients
D. Track inventory with email alerts
E. Utilize Purchase Order Receiving
F. Utilize Store Transfer for multiple restaurant locations
G. Utilize Inventory Adjustment to track waste
H. Sync inventory with your online ordering website
Step 1: Sign up for eHopper
If you do not already have an eHopper account, the first step in efficiently managing your restaurant inventory would be to sign up for eHopper, by choosing from one of the plan options.
You can sign up for the free Essential plan, however, this plan is much more limited when it comes to restaurant inventory management features, so for the most effective results, it is recommended to sign up for either the Freedom, Restaurant, or OmniChannel plan.
You can view what features each plan offers, in addition to pricing options at ehopper.com/pricing Please note that eHopper is currently offering a major discount off its OmniChannel Package. It is currently only $39.99/mo…over 50% off the regular price!
To sign up for an eHopper plan, please follow the below steps.
1. Go to https://ehopper.com/pricing/, scroll down to where it says Sign Up and select the package that you would like to create an account for.
2. On the form, fill out your account information, followed by your payment information.
3. You will receive a Welcome email with your log in credentials.
• You will also receive an email from the eHopper Support team to set up an implementation and training session with you.
Step 2: Set up your account and store
Once your eHopper account has been created, you can install the eHopper app and log in on either a Windows PC (version 8-10), iPad IOS 9.3+, a certified Android tablet (Samsung Galaxy Tab A, Lenova Tab 4), or one of our certified All-in-One devices (found at ehopper.com/hardware).
To learn how to install and log in to each device type, please see https://ehopper.com/how-to-activate-ehopper-pos/
Once you are logged in, you can begin setting up your account and store.
Set up vendors
In eHopper, you can easily set up and manage your vendors, to more adequately track your restaurant inventory data and costs, and ultimately make more informed business decisions.
When you log in to your Back Office, you are able to add multiple vendors and track each of their contact info and other important data, such as Vendor Type ( ‘Manufacturer,’ ‘Master Dealer,’ ‘Shipper,’ ‘Vendor.’), Tax ID, and any notes you would like to track for the vendor, in the Vendors section.
You can set up and track your vendors in eHopper.
Once your products are created (see section below), you can then assign one or more vendors to each product you receive stock of, in the Inventory section, while tracking each of their Vendor SKU’s and item costs.
When new stock comes in from a particular vendor and you would like to update your stock quantities, you can then link the vendor to the purchase order in PO Receiving, and filter your products by vendor to easily view all the vendor’s products and their product costs. The total cost of the purchase order will be displayed when the purchase order is submitted in eHopper.
Create a menu by creating departments, categories, and products
There are 3 main levels of inventory within eHopper, with Departments being the highest level, followed by Categories, and then Products.
All product data can be imported all at once via a .csv file through a product upload template. Please see for more info. If you prefer to add products manually, however, please see the content below.
Create a Department
Before creating a product in eHopper, you have to first create a department that the product falls under, followed by a category that falls under the department (and above the product).
It is very easy to create a Department in eHopper. Simply go to Inventory in the left menu of Back Office, followed by Departments, Then, select the New Department box on the top right of the screen, enter the Department Name in the field, and then click Done.
Create a Category
Once a Department that a category falls under is created, you can quickly create the product category.
To do this, go to Inventory—>Categories, select the New Category box on the top right of the screen, and then enter the Category Name.
You may also optionally select a Category Display Color, which will be the color of the category box that is displayed in the POS, as well as decide whether every product in the category should print to a kitchen receipt printer.
Finally, choose the Department that the Category falls under that had previously been created and click the Done button to save.
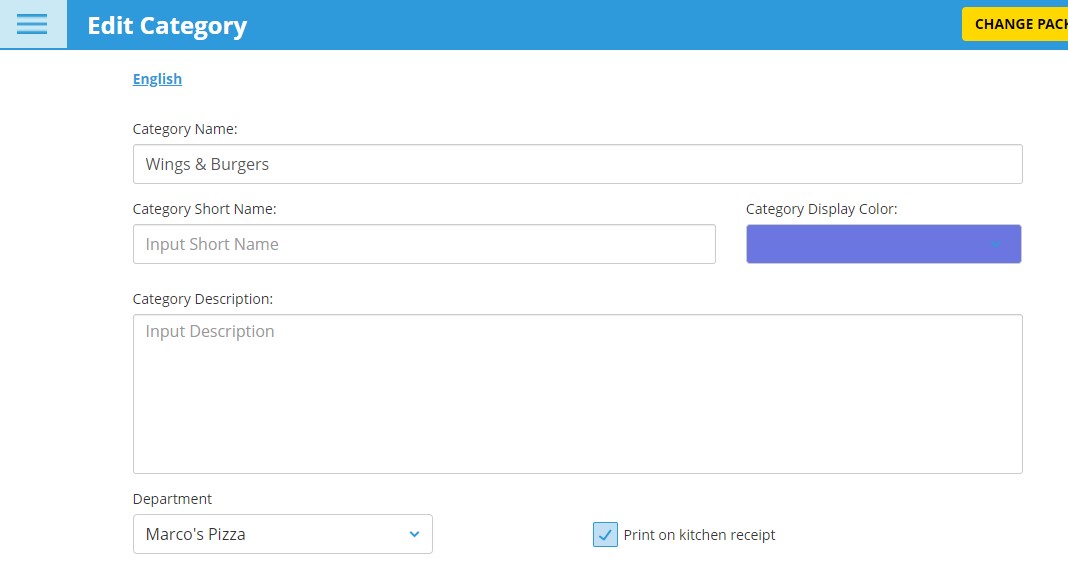
You can easily create product categories and edit their settings in eHopper.
Create a Product
Finally, once a department and category are created, you are able to create one or more products that fall under those departments and categories. Below are the steps to create a product (without ingredients – for instructions on creating products with ingredients, please see the section below):
1. Click on Inventory–>Products in the left navigation menu.
2. Select the blue New Item button on the top right of the screen.
3. You will be moved to the New Inventory Item screen, consisting of the following tabs, placed on the top of the screen. You can navigate between the different tabs by clicking on them.
General Tab
1. Select whether the item you are creating is an Inventory, Non-inventory, Serialized item, or With ingredients by clicking the circle to the left of the option, and enter the Product Name.
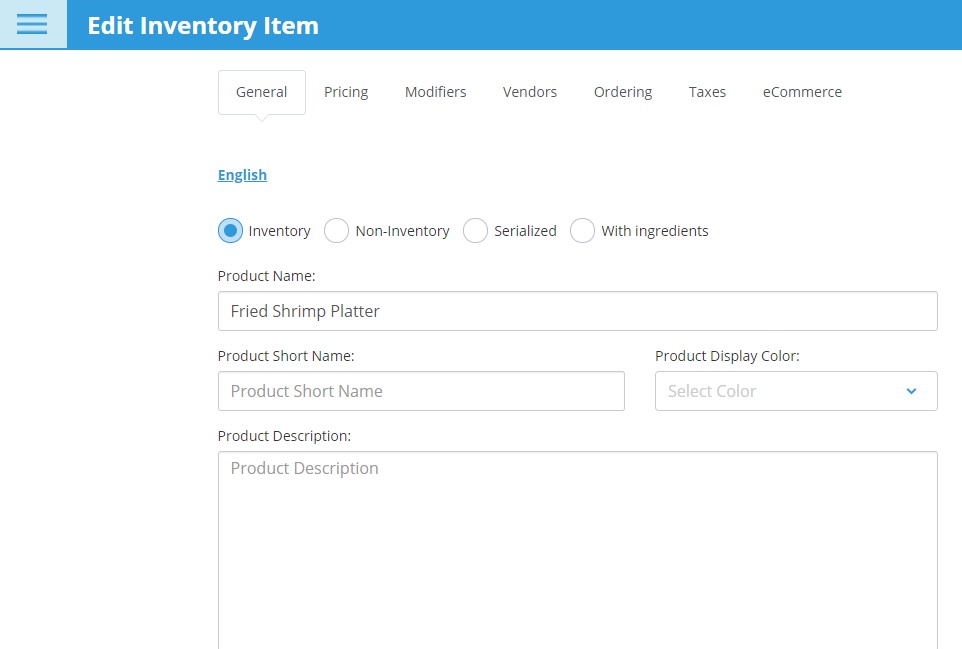
In the product’s General Tab, enter the Product Name.
2. Select both the department and category you would like to associate the product with in the Department and Category drop-down menus respectively (both had to have already been created).
3. Optionally input the product’s UPC, as well as the Product SKU
4. Select the Print on kitchen receipt box if you would like the product to automatically print a receipt to the kitchen printer when ordered and then select one or more Kitchen Printers to identify which kitchen printer the product should print to.
5. If you are using multiple stores, you choose specify which store(s) the product should be sold in from the Sell in Stores drop-down.
6. Optionally provide an image to represent the product in the product catalog in POS by clicking the Browse images square and selecting the image in your computer files. The ideal image resolution is 280 x 250 px.
Pricing Tab
1. Select whether you would like the product to be at a Fixed price that could not be modified or one that you could manually enter and change for each order in POS in the Price Type drop-down.
2. Select the unit of measurement you will be selling the product by in the Unit drop-down menu. Item will be selected by default.
3. If you selected Fixed as the Price Type, input the price of the item per unit of measurement in the Sales Price field.
You can either have the same pricing for a product across all your stores or different in each store. To have separate pricing, choose a store from the Stores drop-down menu and then enter a price for that specific store.
4. By default, the All Discountable field be checked off, meaning there will be an option to provide a discount to the product. If you do not want the option to provide a discount for a product, uncheck the field by clicking on it .
5. Click the Done button to save the product settings or select a different tab.
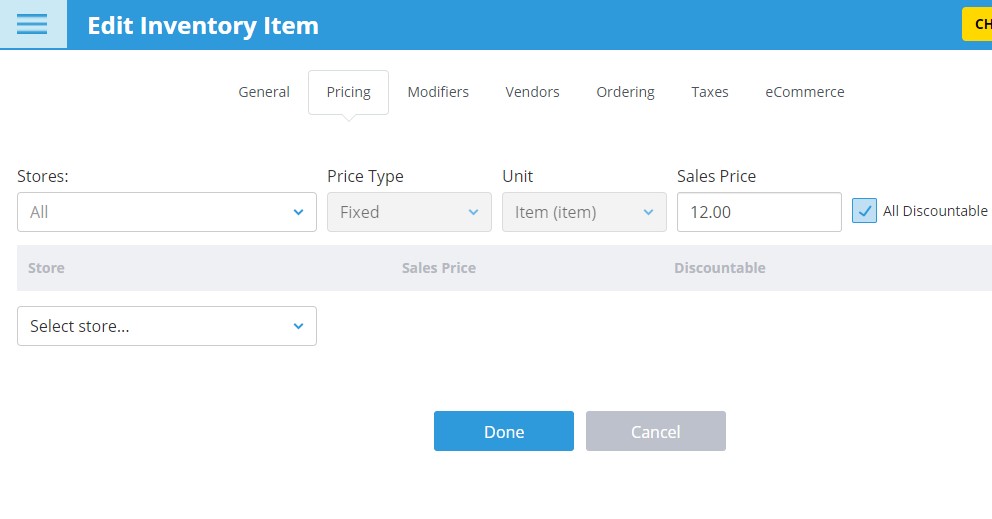
Set up a product’s pricing info in the Pricing tab.
Modifiers Tab
Follow the steps in this section if you would like to add modifier options to the product.
1. From the Select all or one store drop-down, select either one or all stores where you would like to add a Modifier Group to the product.
2. Select the Copy Existing button to copy an existing Modifier Group (created in the Modifiers section) to the product.
Please see https://portal.ehopper.com/portal/en/kb/articles/creating-modifiers to learn more about creating modifiers.
3. The Current Modifiers section displays all existing Modifier Group Names, along with the Modifier names that make up the group and each modifier Price. They are all available for editing.
You can create a new modifier group for only this product by selecting Add modifier group and entering its attributes.
4. Select the Done button or select a different tab.
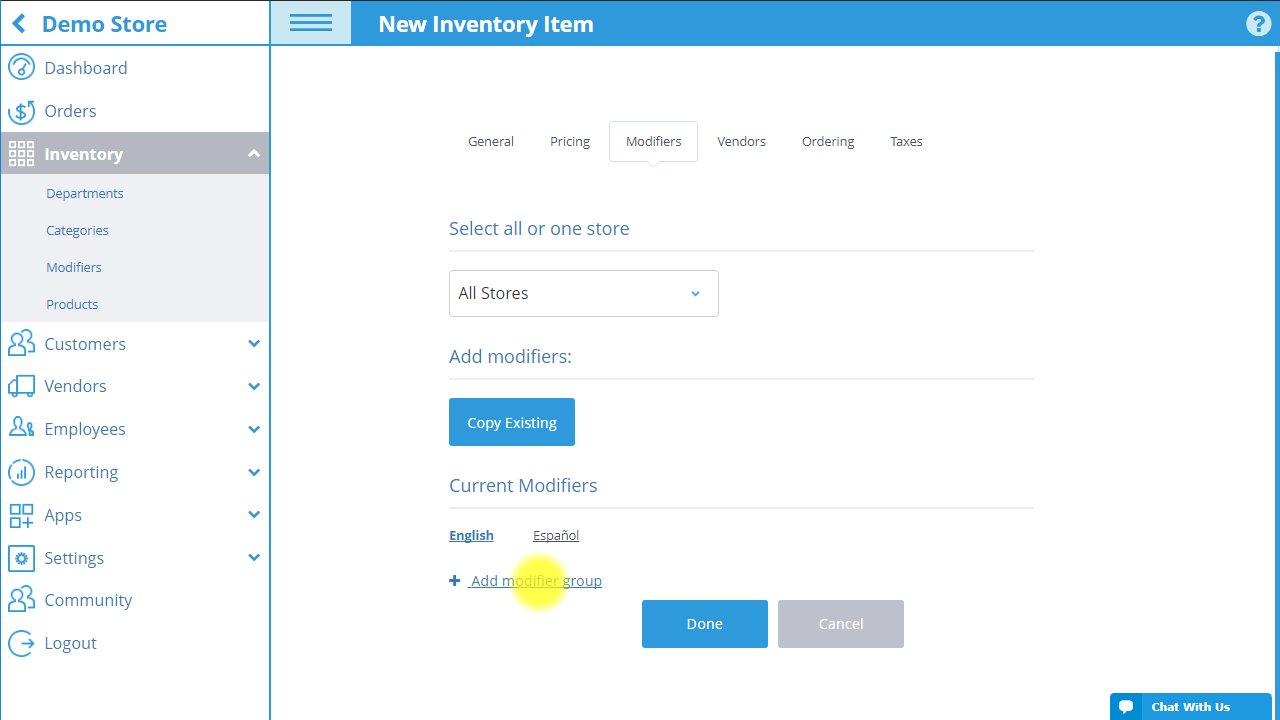
Easily add modifier options to a product.
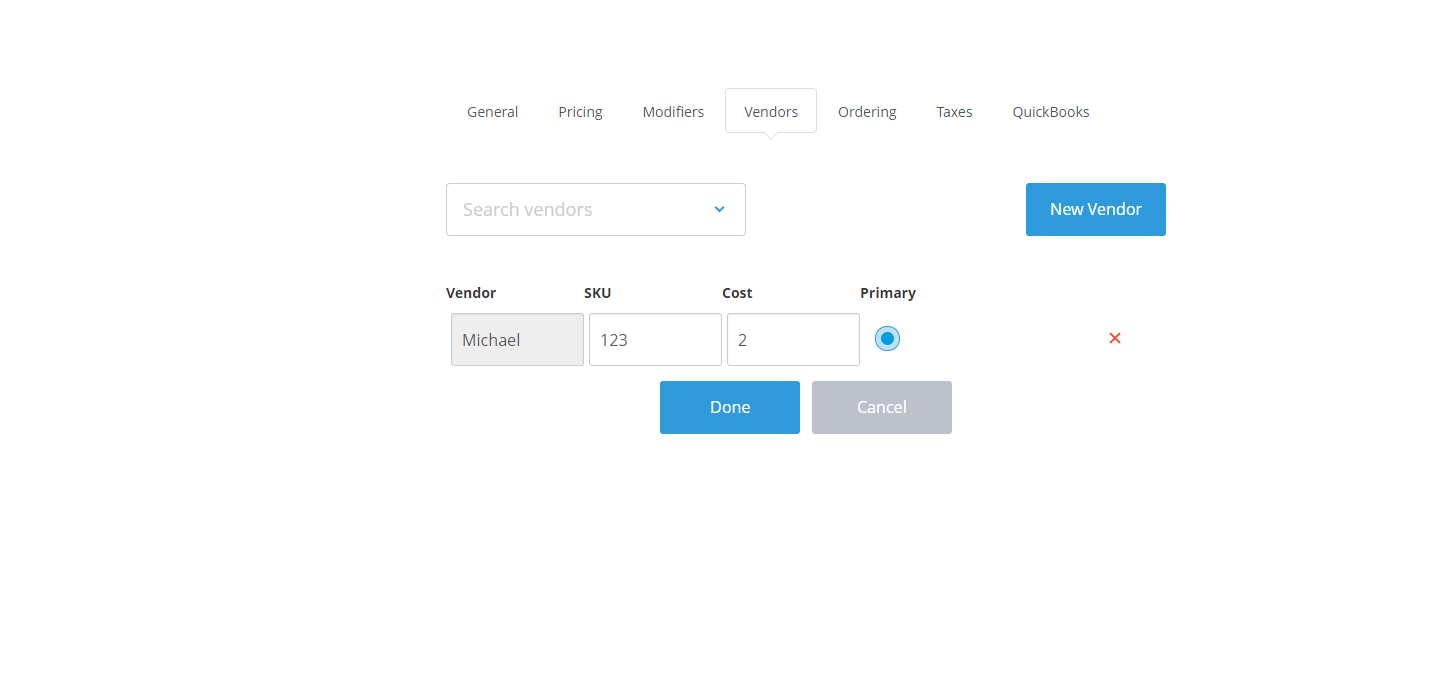
Vendors Tab
The Vendors tab allows you to assign a vendor to a product and input the specific vendor information as applies to that product.
Before you can assign a vendor to a product, you must have already created the vendor in the Vendors section of Back Office. Once the vendor is created, follow the steps below in the product’s Vendors tab:
1. Select a vendor for the product in the Search vendors drop-down menu.
2. In the row that appears, optionally input the product’s Vendor SKU in the SKU column and the amount the item costs for you to acquire in the Cost column, and then select the Done button.
Easily add modifier options to a product.
Ordering Tab
The Ordering tab allows you to monitor the stock of the selected product at the company level and in each of your stores individually.
1. If you would like to set the same quantity levels for the product in all your stores, move to Step #2. If you would like each store to have different quantity levels, select the stores you want to set specific quantities for in the Stores drop-down menu and then enter the quantity levels for each one in the rows that appear.
The quantity remaining of the product in each store will be displayed in the Quantity field.
2. Input the Recommended Quantity and Minimum Quantity in their respective fields. The total remaining quantity of the product in all stores is displayed in the Total Quantity field.
If you installed the Notifications app, you can set to receive a daily email notification informing about all products that have reached the Minimum Quantity number entered into the field (more info on this later on in this blog)
3. Click the Done button or select a different tab.
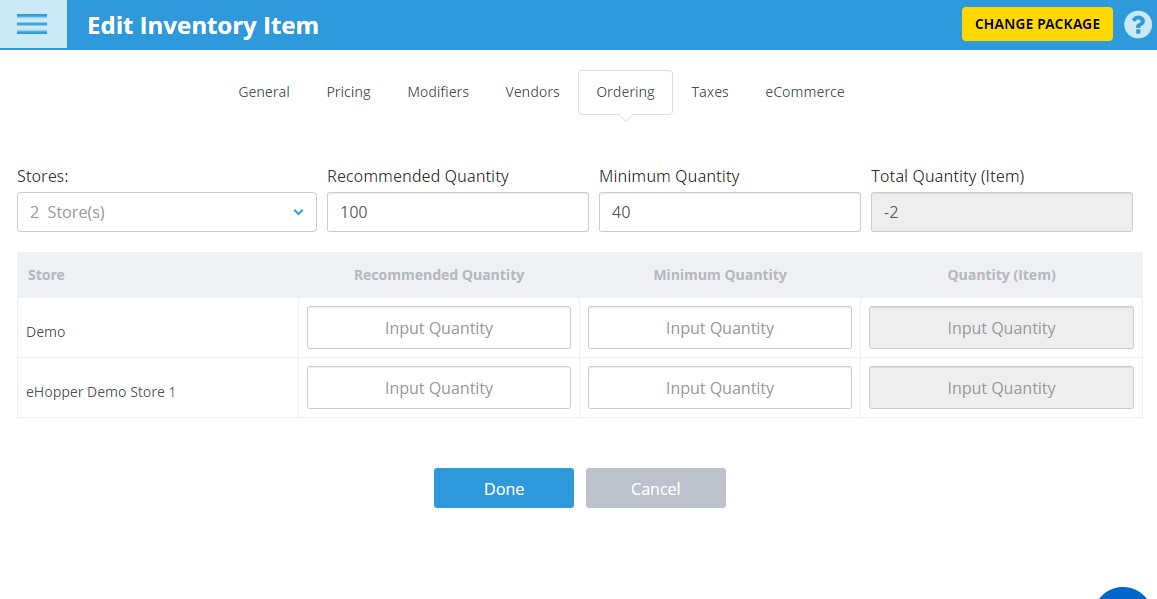
Manage stock quantities for a product in the Ordering tab.
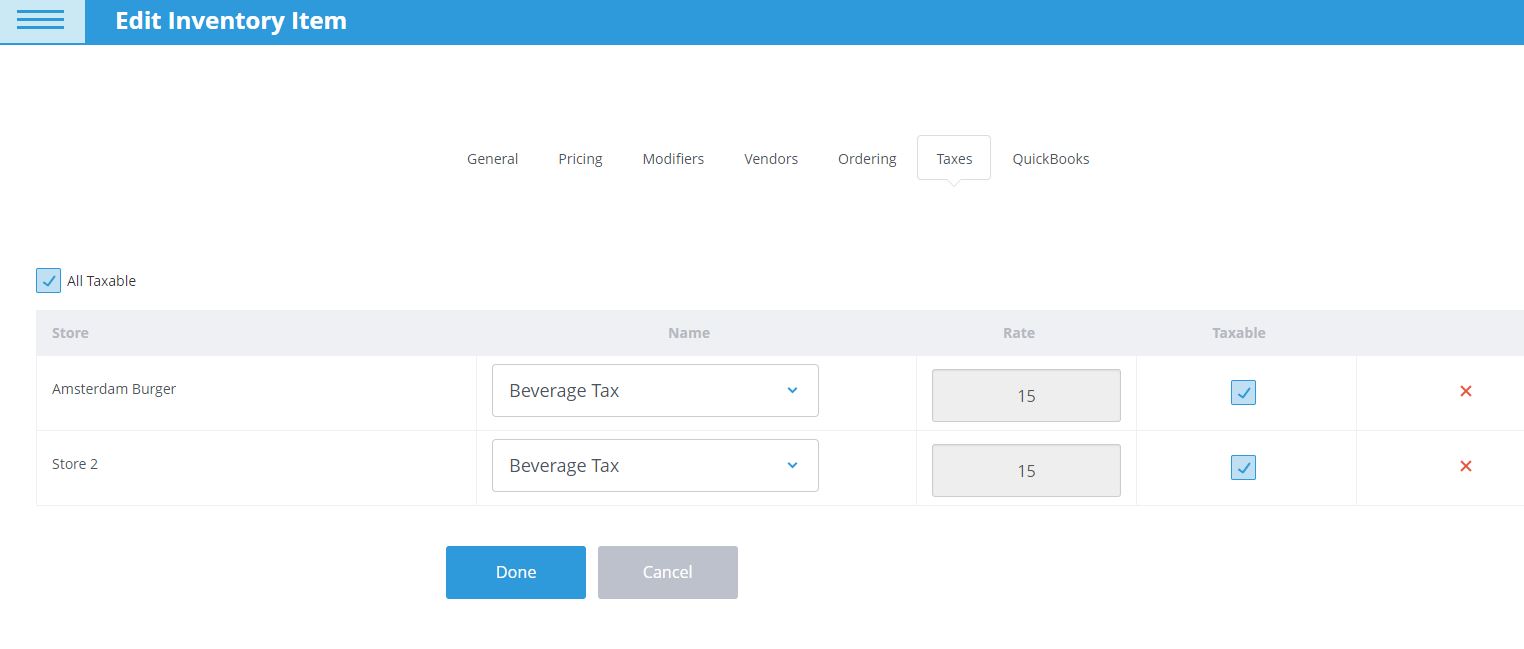
Taxes Tab
Before you can add a tax to a product, you must have already created the tax you want to add to the product in Tax Manager section of Back Office (found by going to Settings—>Tax Manager). If already added, follow the steps below.
1. Select the product tax name in the Name drop-down menu. The tax rate you set for that tax in Tax Manager will automatically appear in the Rate field.
If you would like the tax to be added to the product in all stores that the product is sold, make sure the All taxable box is checked.
2. If you would like to have a different product tax added to a specific store, select the store from the Store drop-down menu and click the + sign.
3. Click the Done button or move to another tab.
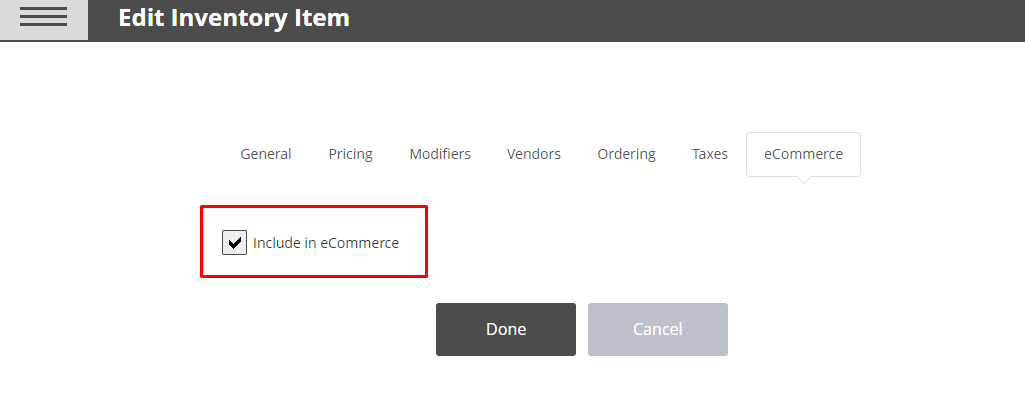
eCommerce Tab
1. In the eCommerce tab, select the Include in eCommerce checkbox to enable a product to appear for sale on your online site.
2. Select the Done button to save.
The product will then be displayed on your site after a scheduled or manual sync in the eCommerce Settings page (found by going to Apps—>eCommerce in the left menu).
Create a Product with Ingredients
With eHopper, can create products with ingredients and specify the quantities of each. Each time the product is sold, the ingredients will be deducted from your stock, so the ingredients can be properly tracked.
Before creating a product with ingredients, you will need to create the ingredients themselves in the Ingredients section. To get to this section, go to Inventory—>Ingredients in the left navigation menu.
Then, follow the steps below for each ingredient you would like to create.
First, you will want to select the New button on the top left of the screen.
Then, in the General tab for the ingredient, input the Ingredient name, optionally enter the ingredient’s Barcode (UPC), and select the unit of measurement that the ingredient will be measured in from the UOM drop down menu.
You can then optionally enter the number of units of measurement (UOM) of the ingredient that will fill up each stock unit in the Conversion number field and enter the name of the stock unit that contains the inputted conversion number for the UOM of the ingredient in the Stock Unit field. Ex: Box, bag, carton, etc.

Quickly create ingredients in eHopper.
In the Vendors tab, select a vendor for the ingredient in the Search vendors drop-down menu and then optionally input the ingredient’s Vendor SKU in the SKU column and the amount the ingredient costs per stock unit from the vendor in the Cost field.
If there are multiple vendors for the ingredient, select the Primary vendor in that column.
In the Ordering tab, input what you would like to be the Recommended Quantity and Minimum Quantity for the ingredient in their respective fields. The current quantity remaining of the product in each store will be displayed in the Quantity field.
Then, click the Done button to save. The ingredient will now appear in the Ingredients list.
Once your ingredient(s) have been created, you are able to create a product with those ingredients. The steps for creating a product with ingredients are exactly the same as the steps for creating a product in the above section, Create a Product, with a few exceptions/additions:
• In Step #4 in the above section, be sure to select the circle option that says with Ingredients.
• There will be the addition of an Ingredients tab (between Modifiers and Ordering) in the product settings. Please select it and follow the directions below.
1. Select the Add Existing button to add one or more ingredient (that you created in the Ingredients section) to the product.
2. Select the box to the left of the ingredient(s) you would like to assign to the product and then select the Done button.
3. In the Current Ingredients section, it displays the names of all existing ingredients that compose the item. Input the quantity of each (in UOM) that are required for the item in the Qty field and the unit of measurement that is used for each in the UOM field.
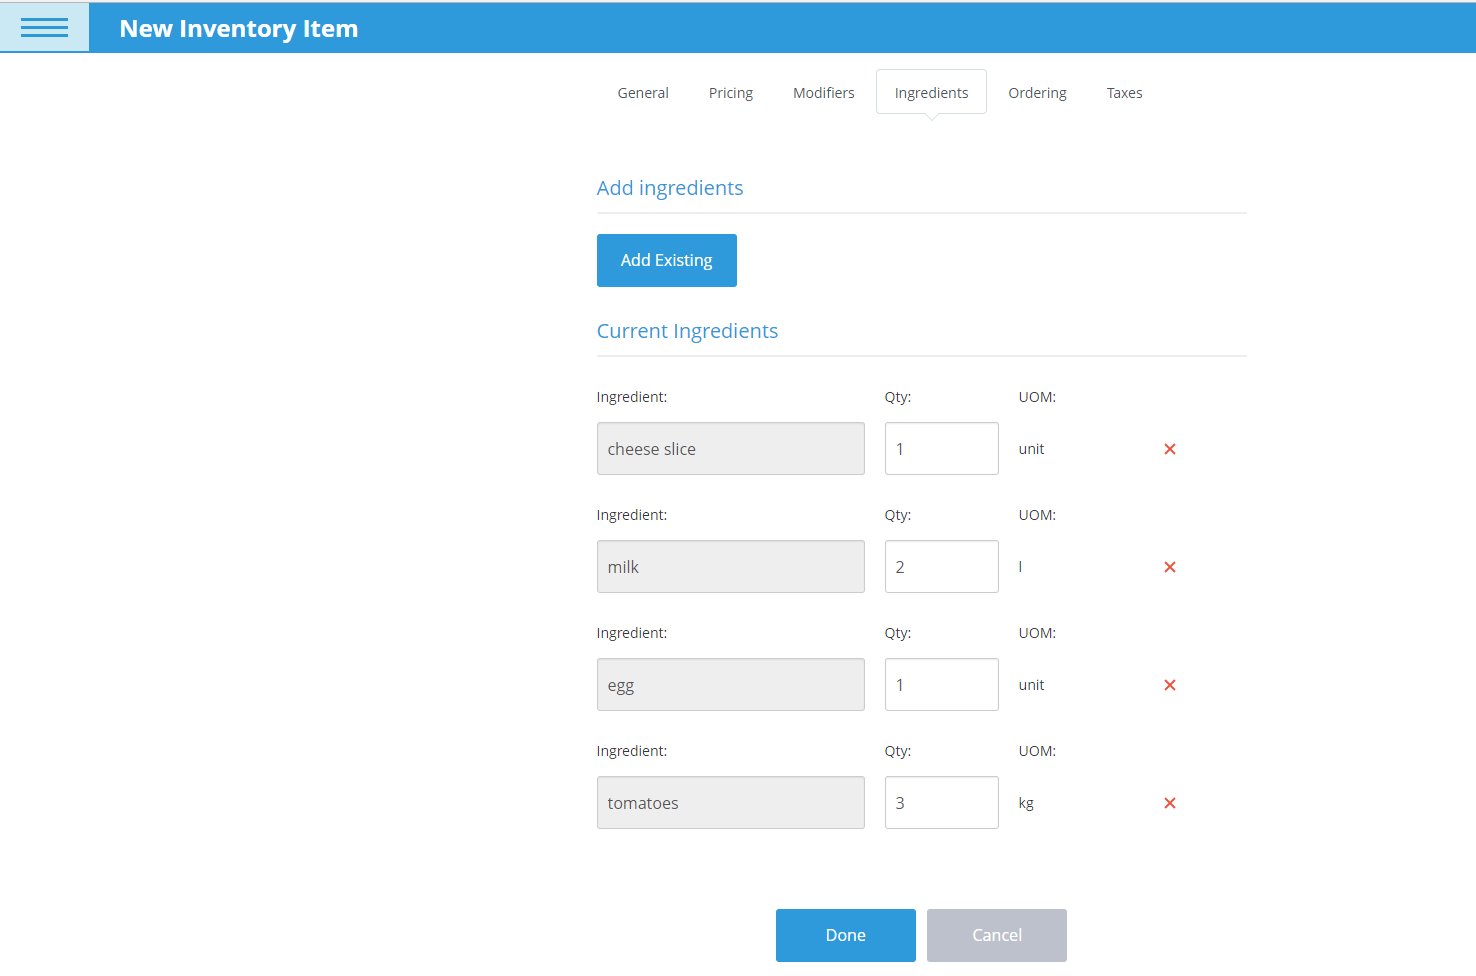
4. Click the Done button to save. Now, every time you sell the product, all ingredient components that are assigned to it will be deducted from your inventory stock count within eHopper reporting (on both the singular unit and stock unit level).
Track inventory Stock with email alerts
Once you start selling the products (and the ingredients that make them up) at your restaurant, your stock will naturally begin to decrease. It is therefore important to always keep close tabs on you stock levels so you can know what to replenish and when. You would hate to find yourself in a situation where a customer wants to order something and you have to decline their business because there is no stock left.
With eHopper’s Notifications feature, you can be notified through email on a daily basis about all products and ingredients that have reached the minimum quantity number that you set for them, in each store. This way, you can receive real time data on your stock levels and avoid profit loss by always knowing when to order more of what items, so you never run out.
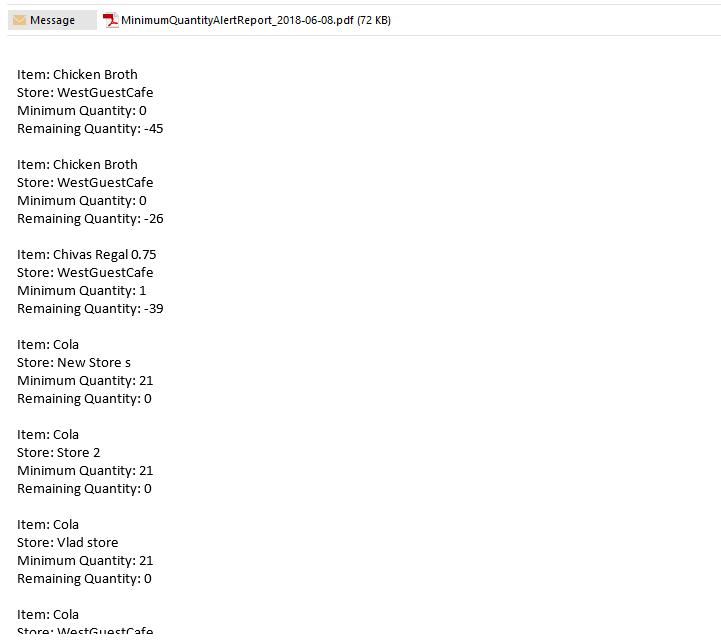
Receive an email every day about all items that have reached their minimum quantity levels.
Utilize Purchase Order Receiving
Once you are notified about low stock quantities for items and ingredients and move forward on restocking by ordering from the appropriate vendors (whom can be assigned to each item and have their contact info and details saved, as reviewed earlier), the next step is to update your quantity levels as the items and ingredients come in.
This is important in order to always have up to date information on your current stock amounts. Otherwise, you will not receive accurate information, and therefore, won’t be able to make insightful decisions on your restaurant inventory, which could lead to waste and profit loss.
For example, you may put in duplicate orders for the same item or ingredient because your stock levels are underrepresented in reporting, causing you to end up with an excessive number of units of the item at your restaurant. This is particularly bad news for items that spoil as many of them will likely need to be tossed out if they are not purchased or used in a timely manner.
With eHopper’s Purchase Order Receiving feature, you can easily update your stock levels of items and ingredients from each vendor and for each of your restaurant locations. Simply enter the Received Qty in the field next to each item that had new stock come in, and then select the Received button to update the quantity levels.
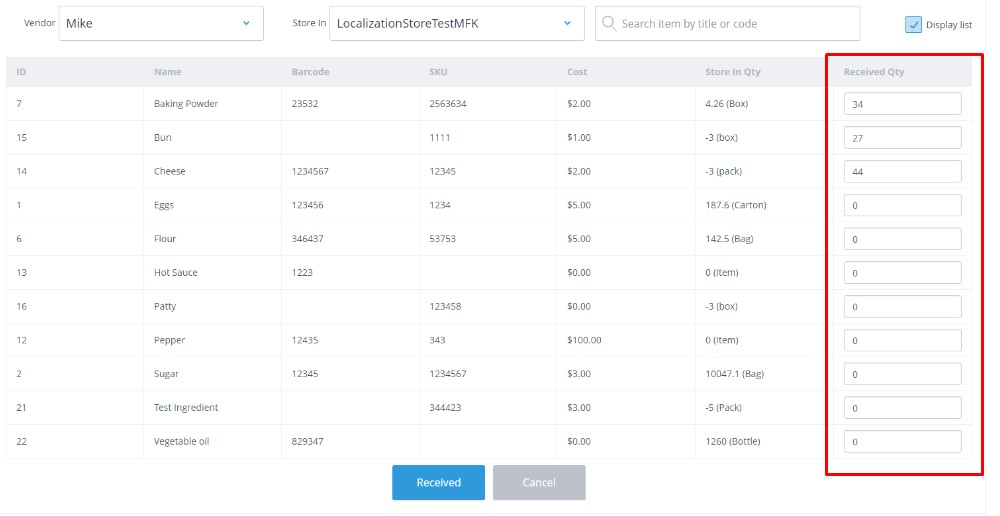
Update quantity levels of items as they come in from vendors with PO Receiving.
The total cost of the purchase order will be displayed as well, for more visibility on your profit margins. You can also review detailed information from your past purchase orders in the PO Receiving Report.
If you prefer, another option is to quickly update your stock levels through the Inventory Import feature.
Utilize Store transfer for multiple restaurant locations
If your restaurant has multiple locations, you may want to transfer stock of items or ingredients from one location to another, in order to better manage your stock levels and costs.
For example, you may have excess stock in one location but not enough in another, so instead of spending time and money on ordering new units for the location lacking in stock or having to throw out excess stock in the other location, leading to profit loss, you can kill two birds with one stone and just send the excess stock from one location to another.
Once stock levels of items have been transferred, you will then want to update your stock quantities for each restaurant location in your POS for tracking purposes, so you can continue making insightful decisions about how to move your inventory to best manage costs and not risk profit loss or waste.
You are able to do this with eHopper’s Store Transfer feature by quickly and easily transferring stock quantities of your restaurant products and ingredients from one location to another, in order to always maintain up to date info on your stock levels at each of your establishments.
Simply select the store you would like to transfer stock from with the Store Out drop-down and the store you would like to transfer to with the Store In drop-down. Next, input the quantities in the Transfer Qty field for each product or ingredient you would like to transfer. Finally, select the Transfer button to update the quantity levels.
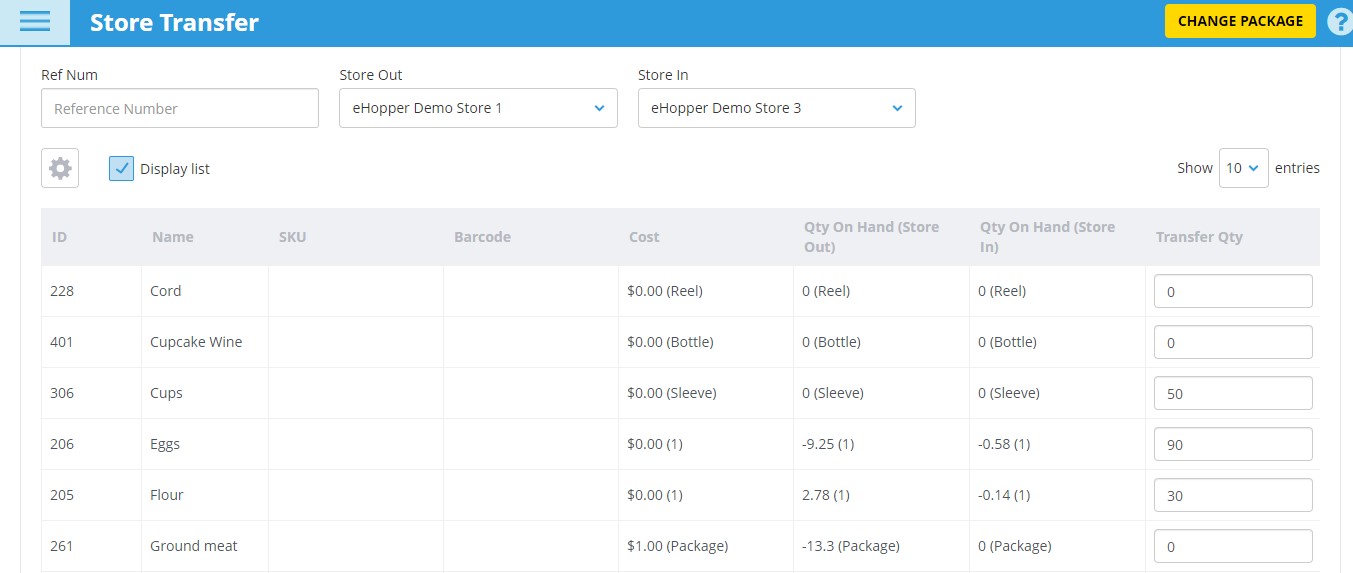
Quickly transfer quantity of food items from one restaurant location to another with the Store Transfer feature.
All store transfer data can then be viewed in the Store Transfer Report at any time, for tracking purposes.
Utilize Inventory Adjustment to track waste
As you probably know, it is fairly common for restaurants to have spoiled, lost, or damaged food items and ingredients in their stock that will no longer be of use. Because of this, it is important that any such adjustments in stock levels be tracked.
If you don’t properly track these adjustments, you will quickly have inaccurate stock levels, causing you to make poor business decisions on which items to restock and when, resulting in profit loss and higher costs than necessary.
With eHopper’s Inventory Adjustment feature, you can easily do just that. Simply enter what the adjusted quantities are for any of your food items and ingredients in the Adjusted Qty field, select the Reason for the adjustment for tracking purposes, and then hit the Done button to update the stock levels. This data can also be viewed in the Adjustment Report at any time.
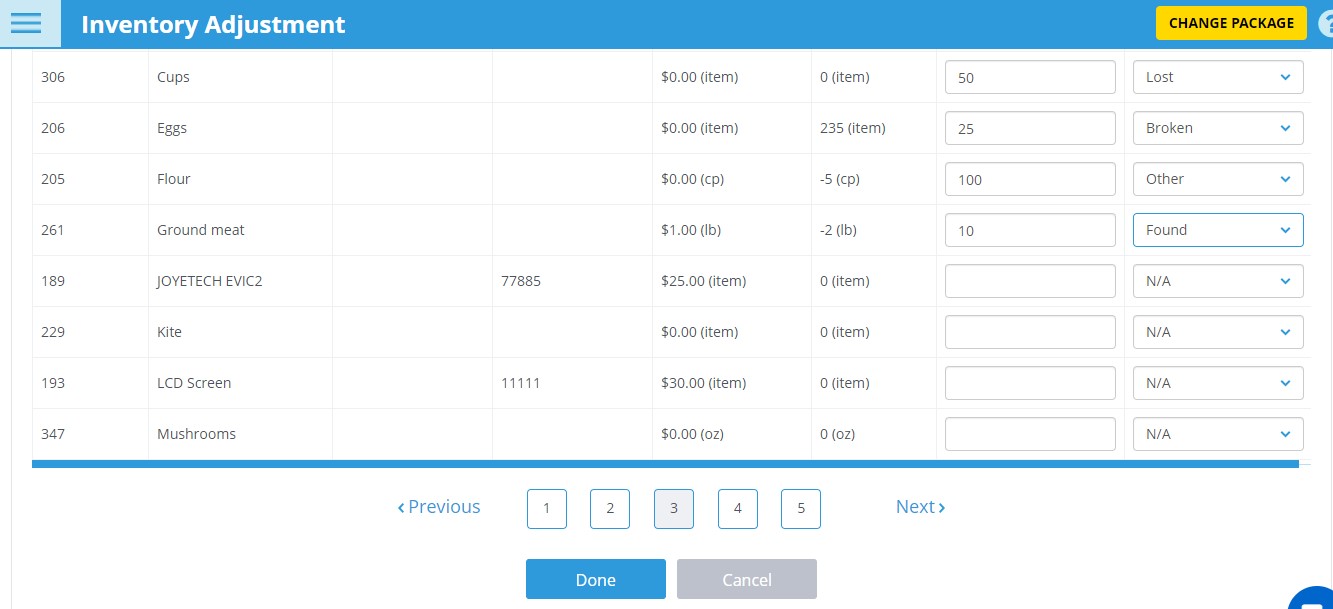
Use Inventory Adjustment to update stock quantities of items that have been lost, stolen, broken, or spoiled.
Sync Inventory with your Online Ordering Website
With eHopper online ordering, you can utilize an online menu as an additional means of selling your restaurant products, and increase profits as a result.
Not only that, but all restaurant inventory data, including product images, pricing, and quantity levels can be synced from the POS to the online site in just minutes.
With eHopper online ordering, you can easily sync all product data, including quantity levels from your POS to an online menu.
This way, you will always have accurate and up to date data flowing between the point of sale and online ordering site, so you can avoid any headaches from overselling or unnecessary loss of profit from not having enough in stock.
In addition, you can choose exactly which items you would like to sell via an online menu and which to only sell at your restaurant location, through the POS.
In the POS, you can then choose to view all restaurant inventory data and reporting from either POS sales, online sales, or both, so you can make the best decisions possible about how and where to increase revenue.
The best thing is, as mentioned earlier, eHopper’s OmniChannel Package, which includes the online ordering functionality, all point of sale features, and a loyalty program, is currently on sale for only $39.99/mo…over 50% off the normal price!
Conclusion
As seen from this guide, it is crucial to utilize restaurant inventory management functionalities via a point of sale in order to make the best and most informed business decisions possible, so you can reduce waste, cut costs, and increase your overall revenue.
It also allows you to dramatically save time and work on more important business tasks by largely automating the inventory tracking process. Finally, it highly minimizes the risk of human error by not having to track all restaurant inventory data by hand and provides more real time insight on the current status of your inventory details.
With eHopper, you can utilize many features that allow for effective restaurant inventory management, including Purchase Order Receiving, Store Transfer, Minimum Quantity Alerts, vendor management, ingredients management, and much more, all at a very affordable price.
Get started with eHopper’s Restaurant Inventory Management features today to increase sales and reduce waste!